
Alhaitham FAQ

Lofty, mien, redd, Lati, snowy, juko
Last updated on Jun 4, 2025
Credits:
- LoftyGinger#0369 - Lead, Author || Weapons
- mien#8650 - Co-Lead, Consultant, Author, Calcs || Talents, Combos, Team Building
- redd#1984 - Author, Calcs || Talents, ER Requirements, Artifacts, Team Building
- Latiwings#3308 - Mastersheet, Author || Character Overview, Talents
- snowy#4028 - Author || Constellations
- juko#9385 - Author || Team Building
- jrm.spirit#2671 - Framecounting
For all Alhaitham Calcs you can reference: Alhaitham Mastersheet by mien#8650 and redd(ඞඞ#1984) and Frames Mastersheet by jrm.spirit#2671
Pre-TC is volatile and subject to change. Everything described in this FAQ is a good faith analysis based on the limited information we have. Team calcs are not established yet, and as with everything in TC, the content in this FAQ should be taken with a grain of salt.
Character Overview
Authored by Lati

Alhaitham is a Dendro on-field DPS with a stacking mechanic that allows him a fairly flexible field time. His kit revolves around his Chisel-Light Mirrors, which convert his basic attacks to Dendro and provide him with additional damage and Dendro application based on the number of Mirrors he has.
Alhaitham relies on Dendro Elemental Reactions to deal respectable damage, most notably through Spread. This means that his teammates will usually consist of at least one Electro character, and Alhaitham will build stats as expected of a Spread DPS: EM, DMG% and CRIT. This doesn’t mean that Spread teams are his only viable teams, though. In fact, as one of the only Dendro characters currently able to apply sustained Dendro on-field, Alhaitham can also be played as an on-field Dendro enabler in Bloom, Burgeon and Hyperbloom teams.
Talents
Authored by redd, Lati and mien

Talent Priority: Elemental Skill > Normal Attack = Elemental Burst
Players should prioritize getting Alhaitham to level 90 over getting high Talent Levels. In Quicken and Quickbloom teams, a significant chunk of Alhaitham’s damage comes from the Spread reaction, which is independent of Talent Levels but scales well with character levels. This means leveling his Talents doesn't yield as much of a DPS gain as it would on most characters, but it is nonetheless beneficial.
Out of Alhaitham’s three Talents, his Elemental Skill comprises the biggest portion of his non-Spread damage, so prioritize that first. If Bursting every other rotation, prioritize his Normal Attacks over his Elemental Burst. If Bursting every rotation, level them both equally.
Talent Overview
When Alhaitham has at least one Mirror, his basic attacks are converted to Dendro. Mirrors can be generated via his A1, Skill and Burst. He can have a maximum of 3 Mirrors at a time and they disappear if he goes off-field. One Mirror will expire every 4s, so players must manage them carefully to maximize Alhaitham’s potential. Note that gaining a new Mirror specifically while having 3 Mirrors will refresh the current Mirror's duration to 4s, though this duration refresh does not happen if he only has 1-2 Mirrors.
It is technically possible to maintain an infinite Dendro Conversion even at C0, though this isn't recommended outside of overworld and co-op.
Upon hitting opponents with his Dendro-converted attacks or Elemental Skill, Alhaitham can trigger a Projection Attack every 1.6s, which deals instances of AoE Dendro DMG based on the number of Mirrors he has. Projection Attacks are triggered on hit, so in practice, the interval between Projection Attacks may be longer than 1.6s. It’s important to note that his Projection Attacks are tied to his Mirrors, which can also be gained through A1 and Burst. As a result, he can gain Mirrors and trigger Projection Attacks without ever using his Skill.
Each Projection Attack inflicts a separate hit for each Mirror currently present, which means that having more Mirrors increases the damage and Dendro application of his Projection Attacks. Due to their 2-hit ICD, every other wave of 3-Mirror Projection Attacks will apply Dendro twice, which markedly increases Alhaitham’s Dendro application rate.
Alhaitham's Burst is a flexible Talent that can be used either as a utility tool to generate Mirrors or as a nuke. His Burst deals additional hits based on how many Mirrors it consumes, and refunds Mirrors equal to 3 minus the number of Mirrors consumed (e.g. consuming 1 Mirror generates 2 Mirrors). Note that Mirrors generated from his Burst are only granted 2 seconds after Alhaitham's Burst animation finishes.
It is generally more optimal to use his Burst with zero Mirrors to generate 3 Mirrors, as using his Burst as a nuke prematurely terminates his DPS uptime pre-C6. This can be useful for frontloading damage or quickly clearing a wave of mobs, but is otherwise generally a suboptimal use of his Burst.
Constellations
Authored by Snowy

C1 - Intuition
- When a Projection Attack hits an opponent, Universality: An Elaboration on Form's CD is decreased by 1.2s. This effect can be triggered once every 1s.
Practically useless. This Constellation allows Alhaitham to use his Elemental Skill again faster when attacking on-field. However, this has no significant effect on gameplay, because Alhaitham’s long cooldown on his Elemental Skill doesn’t allow him to use his Skill twice in most rotations even with this Constellation. Using a second Skill during Alhaitham’s field time also brings the massive drawback of generally having its cooldown not ready in time for the next rotation, as the cooldown on the second Skill will not be sufficiently reduced with his C1. The best use case for this Constellation may be enabling rotations shorter than 18s, using one Skill per rotation. But as of now, this Constellation only has value in overworld/co-op and is otherwise merely a stepping-stone to other Constellations.
DPS increase from C0 : 0%
Rating : 0/5

C2 - Debate
- When Alhaitham generates a Chisel-Light Mirror, his Elemental Mastery will be increased by 50 for 8 seconds, max 4 stacks. Each stack's duration is counted independently. This effect can be triggered even when the maximum number of Chisel-Light Mirrors has been reached.
C2 can be regarded as Alhaitham’s overall second-best Constellation after his C6, providing players with a significant 200 EM boost at maximum stacks. However, if players possess Nahida, it is advised to get her C2 instead, which offers better value in increasing Alhaitham’s personal DPS than his own C2.
DPS increase from C1 : 14%
DPS increase from C0 : 14%
Rating : 3/5

C3 - Negation
- Increases the Level of Universality: An Elaboration on Form by 3.
Given that most of Alhaitham’s damage comes from Spread, which is independent of Talent Levels, C3 provides only a modest ~5% boost. However, players should note that C3 still provides a greater damage boost than C5.
DPS increase from C2 : 5%
DPS increase from C0: 19%
Rating : 1.5/5

C4 - Elucidation
- *When Particular Field: Fetters of Phenomena is unleashed, the following effects will become active based on the number of Chisel-Light Mirrors consumed and created this time around:
·Each Mirror consumed will increase the Elemental Mastery of all other nearby party members by 30 for 15s. ·Each Mirror generated will grant Alhaitham a 10% Dendro DMG Bonus for 15s.
The pre-existing duration of the aforementioned effects will be cleared if you use Particular Field: Fetters of Phenomena again while they are in effect.*
C4 allows Alhaitham to give his teammates an Elemental Mastery buff when he consumes Mirrors, and also gives Alhaitham a Dendro DMG Bonus when he generates them. Since Alhaitham typically starts his rotations with no Mirrors, he usually only benefits from the personal Dendro DMG Bonus. C4 becomes more valuable when C6 is activated, because the latter allows you to consume Mirrors for the team buff while always receiving max Dendro DMG Bonus on Alhaitham. Overall a decent Constellation, and better with C6.
DPS increase from C3 : 10%
DPS increase from C0 : 31%
Rating : 3/5

C5 - Sagacity
- Increases the Level of Particular Field: Fetters of Phenomena by 3.
C5 provides a negligible damage increase in standard rotations where his Burst is used with zero Mirrors, though it has slightly more value in Burst nuke setups. As mentioned previously, most of Alhaitham’s damage comes from Spread, which is unaffected by Talent Levels. This Constellation is only worth getting if you are going for C6 anyway.
DPS increase from C4 : 1%
DPS increase from C0: 32%
Rating : 1/5

C6 - Structuration
- *Alhaitham gains the following effects:
· 2 seconds after Particular Field: Fetters of Phenomena is unleashed, he will generate 3 Chisel-Light Mirrors regardless of the number of mirrors consumed.
· If Alhaitham generates Chisel-Light Mirrors when their numbers have already maxed out, his CRIT Rate and CRIT DMG will increase by 10% and 70% respectively for 6s. If this effect is triggered again during its initial duration, the duration remaining will be increased by 6s.*
Like many characters, Alhaitham’s best Constellation is C6. It ensures that his Burst always grants the maximum number of Mirrors, along with a potential CRIT Rate and CRIT DMG buff. However, it comes with its own caveats—if you try to get some stacks on Burst to take advantage of the guaranteed 3-Mirror refund, you need to save either Skill or A1 to activate the C6 buff by overcapping with the Burst-generated Mirrors. This limits the damage potential of his field time before Burst and also shortens the maximum 3-Mirror uptime he can get after Burst. Players willing to unlock his sixth Constellation are still advised to open with the QE rotation, which should provide a 12s C6 buff from the start as the second Mirror overcap also triggers the duration extension.
DPS increase from previous con : 25%
DPS increase from C0: 66%
Rating : 4/5
Combos
Authored by mien
Alhaitham generally wants to maintain 3-Mirror uptime while he is on field, as 3-Mirror Projection Attacks yield the greatest damage and Dendro application.
More testing is needed to determine specific optimal combos for Alhaitham. Combo optimization aims to: (a) maintain Mirror uptime, (b) line up basic attack hitmarks to lower the interval at which Projection Attacks get triggered, (c) maximize the rate of Dendro application from his basic attacks and (d) much less importantly, maximize MV/s.
Below are some general principles for playing Alhaitham.
General Combo Information
To maximize the length of 3-Mirror uptime, open with Burst, attack/wait/swap for 2s until you get the Mirrors from Burst, then use NAs for ~4s. Use either CA or E to refresh 3 Mirrors, attack for ~4s more, then use E or CA (whichever one you didn't already use) to refresh 3 Mirrors again. You should avoid using CAs in your attack string until you actually want to trigger A1 to top up your Mirrors. After you trigger A1, you can opt to mix CAs into your attack string.
If you want less than 12s total field time, it is optimal to use Q and then E immediately, since this allows you to get the Conversion and start triggering Projection Attacks slightly earlier than waiting 2s for the Mirrors from Burst.
If you opt to Burst every other rotation, you should open the Burstless rotation with E N1C/N2C to get 3 Mirrors and then attack for your desired amount of fieldtime as the Mirrors fall off one by one.
Optimal Attack Strings
N3 dash cancel (N3D) is the optimal NA-only attack string to maximize Dendro application, since his third NA is a multihit. However, be careful not to cancel it too early and accidentally miss the second hit of the third NA.
N2C and N3C are viable CA-based attack strings to maximize the rate of Dendro application. N2C is about the same duration as N3D and is easier to pull off since it doesn't require dash canceling, but its hitmarks may not line up well to maximize Projection Attacks. More live testing is needed to optimize attack strings to maximize Projection Attack procs.
N1C is the fastest way to trigger A1. If you use it when you have no Mirrors, the CA will both trigger A1 and proc the first Projection Attack.
If driving Xingqiu/Yelan/C6 Fischl, it’s better to use strings without CAs.
Other Mechanics
You can use Burst, swap to use a quick ability on another character (such as Dendro Traveler E to funnel particles to Alhaitham, Kuki E, Fischl E, etc), and swap back within 2s to catch the Mirrors generated from Burst. However, if you can’t swap back in time because you get interrupted or delayed, you will lose the Mirrors from Burst, so use this at your own risk. Note that this technique may not be viable at high ping.
Tap E is generally better than Hold E since it’s faster.
A Plunge Attack can trigger both A1 and Projection Attack from the same hit, prioritizing Mirror creation first and then triggering the Projection Attack. This means that you can use Hold E and Plunge to get 3 Mirrors and immediately trigger a 3-stack Projection Attack.
Burst Quickswap
As his Burst multipliers are somewhat underwhelming and he has long 18s CDs on Skill and Burst, using him as a quickswap unit is generally not recommended. However, if you do choose to use him this way, you can do E N1C/N2C to quickly gain 3 Mirrors and then Burst with 3 stacks. Note that pre-C6, this means you won’t have any Mirrors available after Burst, and will need to swap to other units.
C6 Combos
The guaranteed 3-Mirror generation from Burst at C6 allows for more flexibility in using Burst with some stacks part-way through his field time and additional Mirror uptime after Burst. However, the C6 CRIT buff will not proc if you do not save an E or CA for after Burst to overcap the Mirrors. As such, it is possible that even at C6, his optimal combo remains opening his rotation with QE. QE also gives you 12s of C6 buff uptime from the get go, as the C6 duration extension is triggered by immediately overcapping by 2 Mirrors.

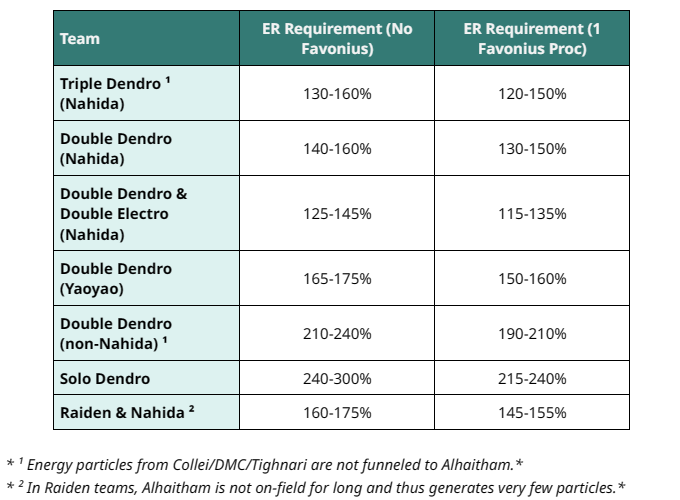
ER Requirement
Authored by redd
Every time a Projection Attack is unleashed, Alhaitham creates one Dendro particle, which can occur once every 1.6s (in practice, this interval is a bit higher). In other words, Alhaitham must take field time to generate Energy. He can be expected to generate 5-6 particles every rotation.
With a 70 Energy Cost, Bursting every rotation with Alhaitham can be challenging. Bursting every other rotation is fortunately a viable playstyle—in that case, Alhaitham’s ER requirement is usually only 100%. Otherwise, it is rarely viable to Burst every rotation without building some ER.
Artifacts
Authored by redd
Sands: EM > ATK% Goblet: Dendro DMG% > EM Circlet: CRIT Rate or CRIT DMG > EM
Substats: EM (~250-300) > CRIT% > EM > ATK% > Flat ATK
With EM scaling on his Talents, a Passive that gives DMG% based on EM, and teams built around reactions, it’s no surprise that EM is a valuable stat on Alhaitham that will almost always be better than ATK. If using his signature weapon Light of Foliar Incision, EM becomes even more important. The 250-300 EM threshold is recommended on Quicken/Quickbloom builds before building CRIT substats, but with an EM Sands, external EM buffs, EM artifact sets, etc. there should be little issue reaching this range.
What about ER?: At higher ER requirements, building ER to Burst every rotation can be a DPS loss. Bursting every rotation at 130-140% ER requirements is roughly equivalent to Bursting every other rotation at 100% ER. Whichever option players go for depends on Alhaitham’s ER requirements, what artifacts they already have, and their playstyle preference. Artifact Sets
 4pc Gilded Dreams: Alhaitham’s BiS set, provided that another character can hold 4pc Deepwood Memories. This set gives him a hefty amount of EM, a stat he greatly appreciates. Although it has a bit of downtime, its 4pc effect is relatively easy to trigger.
 2pc EM/EM/Deepwood Memories: Only slightly weaker than 4pc Gilded Dreams. If players have high substat quality on their 2pc sets (which they likely do), it is possible that this combination of artifacts will overtake 4pc Gilded Dreams.
 4pc Deepwood Memories: This is technically Alhaitham’s BiS set if no other character can hold it to proc the 4pc effect. However, Alhaitham typically deals the most damage in his teams, so it is advised to have another support unit hold 4pc Deepwood and him hold another artifact set instead. In this way, he can benefit from both artifact sets at the same time.
 2pc Emblem of Severed Fate/EM/Deepwood Memories: When Bursting every rotation, 2pc Emblem is a very competitive 2pc option and comes close to 4pc Gilded Dreams, allowing players to build offensive substats instead of ER. Of course, at lower requirements, it is relatively less powerful.
 2pc 18% ATK: A weaker 2pc variation than 2pc 80 EM/15% DMG. Not recommended, but technically better than having no set.
 4pc Gladiator’s Finale/EoSF/Etc: Not recommended. Alhaitham’s damage is distributed throughout his kit. Hence, it is counterproductive to use sets that focus on a singular aspect of his kit.
Weapons
authored by Lofty
Alhaitham has a variety of weapon options at his disposal thanks to his flexible scaling taking advantage of a wide number of stats. Thanks to his reliance on EM over ATK making low Base ATK relatively inconsequential, he has many powerful free options. You can view the full weapon ranking in the WFP Alhaitham Mastersheet.
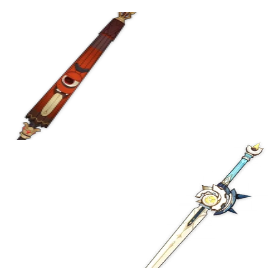
Signature Weapon

Light of Foliar Incision - Alhaitham’s signature weapon gives a hefty 88.2% CRIT DMG and provides an EM-scaling buff to his Normal Attacks and Projection Attacks. It is approximately 8% stronger than the next best option, although its effectiveness is impacted in AoE situations where Alhaitham can use up its buff stacks prematurely on lower-scaling Normal Attacks rather than on Projection Attacks that benefit from A4. Foliar’s passive does, however, synergize well with EM buffs and makes him strongly favor EM in his build. Note that due to his lack of CRIT Rate ascension, it can be difficult to get a 1:2 crit ratio with Foliar.
5 ★ Options

Primordial Jade Cutter - The evergreen stat stick, Primordial Jade Cutter is the 2nd-best option for Alhaitham after his signature weapon, thanks to its CRIT Rate stat and unconditional ATK bonus passive, both of which Alhaitham can take advantage of.

Haran Geppaku Futsu - Tied for 3rd place with Mistsplitter. Alhaitham enjoys its CRIT Rate and Elemental DMG Bonus buff. In order to make full use of its Normal Attack DMG buff, he should use N3D combos.

Mistsplitter Reforged - Tied for 3rd place with Haran. Alhaitham can make good use of Mistsplitter’s Elemental DMG Bonus passive, and he’s able to reliably maintain 3 stacks in most rotations.
4 ★ Options
The 4-star options available to Alhaitham all perform similarly, with less than a 5% difference between them. Oftentimes the choice of 4-star weapon will come down to what stats Alhaitham is lacking. He has an easily available craftable option through Iron Sting, and can also make good use of the free event weapons—Toukabou Shigure and Festering Desire.
Toukabou Shigure / Iron Sting - His best 4-star options, Toukabou Shigure and Iron Sting perform similarly. Between their Elemental Mastery and passive buffs, they both provide everything Alhaitham values in a weapon.
Due to their differing passives, Toukabou Shigure will perform better in single-target scenarios, while Iron Sting will pull ahead in AoE situations.

Festering Desire - A respectable option for Alhaitham that provides useful DMG% and CRIT Rate buffs for his Mirror Projection Attacks. Festering Desire is competitive with Iron Sting and Toukabou Shigure in teams where he can take full advantage of its Energy Recharge stat, but sees worse performance if he does not Burst every rotation.

Xiphos’ Moonlight - Alhaitham values all the stats given by this weapon, which also reduces team Energy needs. However, Xiphos’ passive does not work with many EM buffs, lowering its overall effectiveness.

Sacrificial Sword - It offers Alhaitham the luxury of starting rotations with his Elemental Skill prior to Elemental Burst (changing his rotation to E > N1 > Q > E), allowing him to Burst with 2 Mirrors for additional damage. His typical rotations require R4 minimum to trigger consistently.
3 ★ Options

Harbinger of Dawn - Not to be discounted. With its passive up, Harbinger of Dawn competes with his 5-star weapon options, performing similarly to Haran and Mistsplitter thanks to its CRIT Rate and CRIT DMG buffs. However, given Alhaitham’s role as an on-field character, a shielder is mandatory to realistically take advantage of this weapon.
Team Building
Authored by juko, redd & mien
Early potential teams for Alhaitham primarily focus on Spread for his personal damage. Additionally, he may be used as a driver in Bloom, Hyperbloom and Burgeon comps. Quickbloom teams—teams that allow for both Hyperbloom and Quicken to coexist through slow Hydro application—have also shown great promise. These teams should have similar Quicken uptime to Spread teams, with additional Hyperbloom DMG.
Note that in Burgeon, Nilou Bloom and Hyperbloom teams where Alhaitham does not get many Spreads, his personal damage will be underwhelming. It would thus be more useful for him to Burst every rotation for better Mirror uptime and higher Dendro application. To reach his ER requirements, particularly when he is the solo Dendro unit, it is likely better to gear him with supportive ER weapons like Favonius Sword.
Quicken Teams
Alhaitham | Electro | Electro/Dendro | Flex
Example Team: Alhaitham/Nahida/Fischl/Kuki Shinobu
Example Team 2: Alhaitham/Yae Miko/Fischl/Zhongli

With his high Dendro application and EM to DMG% conversion on his A4, it’s no surprise that Spread is a massive boon to Alhaitham’s DPS output. Additionally, there are multiple Electro units that can contribute substantial off-field damage via Aggravate. A secondary Dendro unit can also be slotted in for extra Spread procs and Dendro Resonance.
Electro Units: Fischl, Yae Miko, Kuki Shinobu, Beidou, Kujou Sara, Raiden Shogun Dendro Units: Nahida, Collei, Dendro MC, Yaoyao Flex Units: Zhongli, Kazuha, Sucrose, Albedo
Hyperbloom /Quickbloom Teams
Alhaitham | Electro | Hydro | Flex
Example Team: Alhaitham/Kuki Shinobu/Xingqiu/Nahida
Example Team 2: Alhaitham/Raiden Shogun/Xingqiu/Yelan

Quickbloom teams utilize a lower amount of Hydro application compared to Dendro application, so as to allow for high to full Quicken uptime with additional Hyperbloom DMG from Electro character(s). Quickbloom teams focus more on Alhaitham’s on-field Spread DMG and the Electro character’s Aggravate DMG, though units with EM-scaling such as Kuki can also build full EM to maximize Hyperbloom DMG. Alhaitham should stick with his normal EM/DMG/CRIT build.
Note that due to Alhaitham’s high Dendro application and tendency to run with Nahida as a second Dendro, you should still get decent Quicken uptime even with a unit like Xingqiu.
Hyperbloom teams utilize more abundant Hydro application, resulting in notably lower Quicken uptime and a much greater portion of team damage coming from Hyperblooms. Alhaitham serves more of an on-field driver role in such teams. It may be beneficial to run two Hydro units to keep up with Alhaitham’s on-field Dendro application.
Electro Units: Kuki Shinobu, Raiden Shogun, Yae Miko, Fischl, Lisa, Beidou Hydro Units: Xingqiu, Yelan, Kokomi, Barbara Flex Units: Zhongli, Kazuha, Sucrose, Dendro units
Burgeon Teams
Alhaitham/Hydro/Pyro/Flex Alhaitham | Pyro | Hydro | Flex
Example Team: Alhaitham/Thoma/Kokomi/Xingqiu

With his high, consistent Dendro application, Alhaitham can be used as an on-field unit to enable Burgeon teams. However, such teams have delicate setups, as triggering Burning can easily lose Blooms. Running a defensive unit such as a healer/shielder is also necessary due to Burgeon self-damage.
Pyro Unit: Thoma Hydro Units: Xingqiu, Yelan Flex Units: Zhongli, Fischl, Kokomi, Kazuha, Sucrose, Diona, Kaeya, Rosaria, Yaoyao
Bloom Teams
Alhaitham | Nilou/Hydro | Hydro/Dendro | Hydro
Example Team: Alhaitham/Nilou/Kokomi/Nahida
Example Team 2: Alhaitham/Nilou/Kokomi/Xingqiu

Alhaitham can also be used as an on-field Dendro enabler in Nilou teams. Unfortunately, he has little utility, and his personal damage will be lower than usual as he has little reaction ownership unless all three of his teammates are Hydro units. It is strongly recommended to bring a healer, or Alhaitham will not survive the Bloom self-damage. Swapping him out midway is punishing, as his Elemental Skill has a 18s CD while his Burst costs 70 Energy, and he has no off-field Dendro application to compensate.
Hydro Units: Nilou, Kokomi, Xingqiu, Yelan, Barbara Dendro Units: Nahida, Collei, Dendro MC, Yaoyao
 Edit this page on GitHub
Enable hardware acceleration for the best site performance | Built using  and
and 
Wangsheng Funeral Parlor is in no way sponsored, endorsed or administered by or associated with miHoYo Co., Ltd.
