
Baizhu FAQ

NatC, Leifa, gerryoat
Last updated on Jun 4, 2025
Credits:
- NatC#9175 - Lead, Author, Calcs(Weapon, Constellation)| Talents
- Leifa#1359 - Author | Overview, ER, Artifacts, Weapons, Teambuilding, Comparisons
- gerryoat#6790 - Author | Constellations
- KB#1111 - Healing Constellation Calcs | Consulting
- Tsubasa#0387 - Calcs (Artifacts)
- snowy#4028 - Calcs (Bloom Team Calcs, Artifacts)
- Sir Von | Skill Deficiency Cult#7672 - Constellation Calcs
- sigurd#3854 - Calcs (Aggravate Team Calcs), Consulting
- Athena#2444 - Consulting
For all Baizhu Calcs you can reference: Baizhu Mastersheet by NatC, sigurd, Tsubasa, Sir Von and snowy, Kaveh Frames Mastersheet by Sir Von
Pre-TC is volatile and, as always, perpetually subject to change until release (and sometimes later!). Please note that these are theoretical suggestions. Everything described in this FAQ is a good faith analysis based on the little information about the character’s kit that we know. Team calcs, additionally, are not established yet, and as with everything in TC, the content in this FAQ should be taken with a grain of salt.
Character Overview
Authored by Leifa

Baizhu is a 5-star defensive character, providing high amounts of healing through both his Elemental Skill and Burst. On top of this, his A4 provides a substantial Dendro Reaction DMG buff to characters healed by his Elemental Burst, based on his Max HP. This incentivises players to build him with as much HP as possible, which is made easier by his HP% Ascension stat. His personal damage will be relatively low in exchange for the comfort he provides.
In terms of teams, Baizhu is quite flexible, finding a spot in most teams where his sustained Dendro application and defensive utility is appreciated. Baizhu also has relatively low field time, needing only to cast his Skill, Burst, and then swap off.
Talents
Authored by NatC
Leveling priority: Elemental Burst > Elemental Skill > Normal Attack

A large portion of Baizhu’s healing, shielding, and buffing scales with his Max HP. Thus, if you wish to utilize his kit to the fullest, leveling him to 90 should be a valid consideration.
Normal Attacks: The Classics of Acupuncture
Baizhu’s Normal Attack multipliers are slightly lower than Nahida’s. That being said, although the latter can be run on-field in certain scenarios, Baizhu prefers stacking HP% and ER% over any other offensive stats. Hence, there is little to no reason to run him on-field if your team does not need the additional Dendro application, unless you specifically wish to build him to do so. However, be prepared for Baizhu’s extremely small Normal Attack hitboxes, which will require you to essentially facehug your opponents in order to hit them.
Elemental Skill: Universal Diagnosis [10s CD]
Baizhu’s Skill will create a Gossamer Sprite that will either travel in the direction Baizhu is facing (assuming there are no enemies) or attack an enemy, dealing Dendro DMG and hitting them up to three times in single-target or bouncing to different enemies in multi-target scenarios, prioritizing enemies that haven’t been previously hit by Gossamer Sprite. Upon either reaching the end of its travel path or hitting enemies three times, the Gossamer Sprite will return to the party, healing all nearby party members by a percentage of Baizhu’s Max HP.
Elemental Burst: Holistic Revivification[20s CD] [80 Energy]
Baizhu’s Burst makes him enter the Pulsing Clarity state for 14 seconds, generating a Seamless Shield that absorbs Dendro DMG with 250% effectiveness and reforms every 2.5 seconds after its initial creation.
Although Baizhu’s shielding prowess isn’t his forte, the constant refreshing and healing every 2.5 seconds means that your active character should be well-protected, even in teams that are more dangerous to play in nature (e.g. Nilou Bloom).
Furthermore, thanks to the shields, your active character will also have noticeably increased resistance to interruption, even considering how small the shields are.
Ascension 1 Passive: Five Fortunes Forever
Baizhu’s Ascension 1 Talent has two components to it, being somewhat similar in nature to a Constellation 0 Bennett. When your active character is below 50% HP, Baizhu will gain an additional 20% Healing Bonus, enabling him to more reliably keep your active character healthy.
On the other hand, when your active character’s HP is equal to or above 50%, Baizhu will gain 25% Dendro DMG Bonus, which can be helpful when the team does not require the excess healing.
Ascension 4 Passive: All Things Are of the Earth
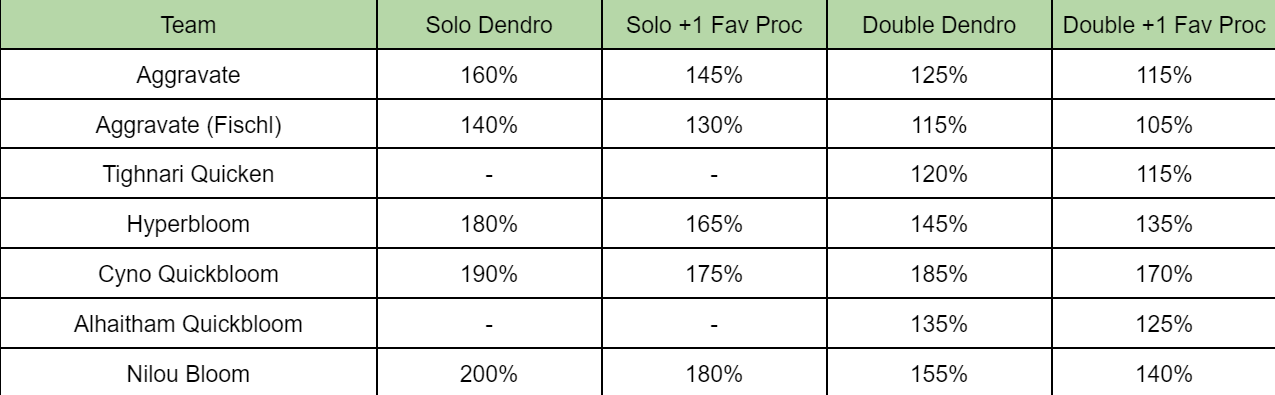
Baizhu’s Ascension 4 Talent gives him some much needed team buffing to help set him apart from other defensive characters, providing characters healed by his Burst 2% Bloom Reaction DMG and 0.8% Quicken Reaction DMG for every 1,000 Max HP he has, up to 50,000. This means he can provide up to 100% Bloom and 40% Quicken Reaction DMG at 50,000 HP,. incentivising players to stack HP on Baizhu.
Thankfully, Baizhu doesn’t particularly care for stats outside of HP and ER, meaning building for this Passive doesn’t hinder his performance. Unfortunately, this buff only lasts six seconds until it needs to be refreshed again, meaning it doesn’t benefit off-field teammates much, if at all.
Overworld Passive: Herbal Nourishment
Baizhu’s Overworld Passive heals the active character slightly when collecting certain harvestable items. A simple yet convenient Passive when exploring.
Constellations
Authored by gerryoat
NOTE: Unless your Baizhu is specifically built to maximize damage, his personal DPS should not be your primary target of optimization. DPS numbers below are calculated with Baizhu optimized for a support build, so performance will vary if you decide to build him for damage.

C1 - Attentive Observation
- Universal Diagnosis gains 1 additional charge.
This Constellation gives Baizhu’s Elemental Skill an extra charge. This Constellation can help with achieving slightly more Dendro application and healing while also giving his rotations more flexibility and forgiveness. Being able to get in an extra Elemental Skill in a rotation also helps with his Energy issues.
Team Aggravate DPS Increase from C0: 1.23%
Team Bloom DPS Increase from C0:0.41%
Total Team Healing Increase from C0:0%
Single Target Increase from C0:0%
Rating: 2/5

C2 - Incisive Discernment
- When your own active character hits a nearby opponent with their attacks, Baizhu will unleash a Gossamer Sprite: Splice.
- Gossamer Sprite: Splice will initiate 1 attack before returning, dealing 250% of Baizhu's ATK as Dendro DMG and healing for 20% of Universal Diagnosis's Gossamer Sprite's normal healing.
- DMG dealt this way is considered Elemental Skill DMG. This effect can be triggered once every 5s.
This Constellation adds negligible damage and a decent amount of healing. The most important part of this Constellation is that it adds an extra instance of Dendro application every 5s. This extra Dendro application can be very helpful for reaction teams that rely heavily on Baizhu for Dendro application.
This Constellation seems to not have a requirement to trigger besides dealing damage to enemies, and seems to just activate whenever Baizhu is on the team. The ability to apply extra Dendro without taking any extra field time makes this Constellation pretty decent in certain teams with characters that need to stay on-field for longer durations, such as Cyno.
Team Aggravate DPS Increase from C0: 2.73% | Team Aggravate DPS Increase from C1: 1.48%
Team Bloom DPS Increase from C0: 3.80% | Team Bloom DPS Increase from C1: 3.37%
Total Team Healing Increase from C0: 43% | Total Team Healing Increase from C1: 43%
Single Target Increase from C0: 13.6% | Single Target Increase from C1: 13.6%
Rating: 3/5

C3 - All Aspects Stabilized
- Increases the Level of Holistic Revivification by 3.
Adds three levels to his Elemental Burst. A relatively straightforward Constellation, increasing his almost negligible damage on his Burst ever so slightly. It also marginally increases Shield Strength and healing on his Elemental Burst, but his shield will still be relatively weak, and his healing will still be more than enough without this Constellation.
Team Aggravate DPS Increase from C0: 3.83% | Team Aggravate DPS Increase from C2: 0.10%
Team Bloom DPS Increase from C0: 3.87% | Team Bloom DPS Increase from C2: 0.07%
Total Team Healing Increase from C0: 52.7% | Total Team Healing Increase from C2: 6.58%
Single Target Increase from C0: 26.2% | Single Target Increase from C2: 11.2%
Rating: 0/5

C4 - Ancient Art of Perception
- For 15s after Holistic Revivification is used, Baizhu will increase all nearby party members' Elemental Mastery by 80
When Baizhu uses his Elemental Burst, he gives party members an additional 80 Elemental Mastery. While this may seem like a very good Constellation, since he will mostly be used in Dendro Reaction based teams, 80 Elemental Mastery is not as much as you might think. If your main focus is Elemental Mastery sharing for Baizhu, just equipping a 4PC Instructor set alone will give 120 Elemental Mastery for the whole team. While adding an extra 80 Elemental Mastery will still be a damage increase for the team, it’s not the biggest.
Team Aggravate DPS Increase from C0: 5.43% | Team Aggravate DPS Increase from C3: 2.53%
Team Bloom DPS Increase from C0: 5.55% | Team Bloom DPS Increase from C3: 1.62%
Total Team Healing Increase from C0: 52.7% | Total Team Healing Increase from C3: 6.58%
Single Target Increase from C0: 26.2% | Single Target Increase from C3: 11.2%
Rating: 2/5

C5 - The Hidden Ebb and Flow
- Increases the Level of Universal Diagnosis by 3
Adds three levels to Baizhu’s Elemental Skill Talent. Another negligible damage increase for Baizhu on this Constellation, but his healing will increase slightly. Despite this, it’s not much of a big deal, since his healing will very likely be more than enough regardless.
Team Aggravate DPS Increase from C0:5.57% | Team Aggravate DPS Increase from C4:0.13%
Team Bloom DPS Increase from C0:5.69% | Team Bloom DPS Increase from C4:0.14%
Total Team Healing Increase from C0:70.7% | Total Team Healing Increase from C4:11.8%
Single Target Increase from C0:35.3% | Single Target Increase from C4:7.2%
Rating: 0/5

C6 - Elimination of Malicious Qi
- Increases the DMG dealt by Holistic Revivification's Spiritveins by 8% of Baizhu's Max HP. Additionally, when Gossamer Sprite or Gossamer Sprite: Splice hit opponents, there is a 100% chance of generating one of Holistic Revivification's Seamless Shields. This effect can only be triggered once by a Gossamer Sprite or Gossamer Sprite: Splice
CAdds HP% DMG scaling to his Elemental Burst, which makes its damage more noticeable. When his Elemental Skill or his Constellation 2 hits an opponent, a new shield is created when he uses his Elemental Burst, increasing his Dendro application. This Constellation adds roughly around six more applications of Dendro into a 20s rotation, making it possible to run Baizhu as your solo Dendro character in certain teams where you normally would not be able to. A decent Constellation, but overall underwhelming compared to other limited 5-star C6s.
Team Aggravate DPS Increase from C0: 1.26% | Team Aggravate DPS Increase from C5: 6.90%
Team Bloom DPS Increase from C0: 6.02% | Team Bloom DPS Increase from C5: 0.31%
Total Team Healing Increase from C0: 109.8% | Total Team Healing Increase from C4: 22.9%
Single Target Increase from C0: 114 .1% | Single Target Increase from C5:5 8.2%
Rating: 3/5
Energy Recharge Requirement
Authored by Leifa
Baizhu’s Elemental Skill generates three Particles with a 50% chance of four upon first hitting an enemy. Due to having an 80 cost Burst, Baizhu’s Energy requirements are extremely high. Thankfully, both Prototype Amber and his signature weapon, Jadefall’s Splendor, grant Flat Energy. Hence, they are vital in making his requirements manageable. In quickswap-style teams, Baizhu can fit two Skill casts helping to reduce his Energy requirements by around 30%. All calculations use Prototype Amber R5 and assume he’s off-field when Favonius is triggered, due to Baizhu never wanting to take increased field time.
For a more accurate approximation of his requirements for your rotation, please use the Energy Recharge calculator linked here.
Artifacts
Authored by Leifa
Artifacts Stats
Sands of Eon: HP% or ER%
Goblet of Eonothem: HP%
Circlet of Logos: HP% or HB%
Due to Baizhu contributing very little team damage, it's best to focus strictly on his defensive utility by building mainly for HP%. On top of this, his A4 Passive scales with his Max HP up to 50k, meaning players should try to get as close to 50k HP as possible after meeting his Energy requirements.
Since Baizhu's Burst has a high energy cost and he has low Energy generation, some players may need to run an Energy Recharge% Sands to accommodate his needs. HP% Circlet tends to be better overall than Healing Bonus%, however it is a valid option if players have nothing else.
Substats: ER% (Until ER Reqs are met) > HP% (Until 50k) > EM (If Nilou Bloom)
Baizhu doesn’t need many stats at all, as players are able to cap out his A4 Passive at KQM investment with little to no HP substats. This allows players to focus on his Energy Recharge, the main caveat of his kit. Once both of these stats reach their recommended level, there aren’t really any stats he benefits from, making him quite cheap to build. In Nilou Bloom teams specifically, extra EM substats wouldn’t hurt.
Artifacts Set
 4PC Deepwood Memories
If Baizhu is the only Dendro character on your team, in teams revolving around Bloom Reactions, the 30% Dendro Resistance Shred from Deepwood is very valuable. However, Baizhu can struggle to consistently apply this effect to all enemies in bigger AoE scenarios. This is due to his Skill only targeting three enemies per use, and his Burst consisting of primarily single-target projectiles. The 2PC bonus, however, doesn’t do much for him at all due to Baizhu not being built for damage anyways. As the solo Dendro character in Quicken teams, there’s no reason to run this set due to Baizhu being the only one dealing Dendro DMG. If he’s run with other Dendro characters, they can make better use of the 4PC set bonus as they will probably trigger it more consistently than Baizhu.
 4PC Ocean-Hued Clam (OHC):
Due to Baizhu’s large amount of healing, he can make consistent Clam bubbles while his Burst is active. Clam can be a decent upgrade to Baizhu’s personal damage, but other artifact sets may be more beneficial to team damage depending on the scenario. For example, Quicken teams may appreciate other buffs, such as ATK or EM, more than this set’s buff to personal damage. In teams such as Nilou Bloom, Kokomi can cap out Clam bubbles a lot more consistently compared to Baizhu. However, Kokomi likes to build full EM in that setup, which a lot of players may not be able to do with 4PC Clam. Because of this, running Kokomi on triple EM FoPL / GD and Baizhu on 4PC Clam is a viable option.
 4PC Noblesse Oblige
The increase to Elemental Burst DMG isn’t notable here due to Baizhu’s low personal damage. However, the team-wide ATK% buff can be useful in Quicken teams with more external EM buffs than ATK buffs.
 4PC Instructor
If Baizhu is being used mainly for his buffing passive, 4PC Instructor can provide a larger overall Effective EM buff, even if Baizhu’s passive isn’t being maxed out. This is due to his A4 requiring a lot of investment for the amount it actually provides. Although his healing and shielding will suffer due to 4-star artifact stats, his healing scaling is high enough that this shouldn’t be a big hit on survivability for most players.
 4PC Maiden Beloved:
If you don’t think Baizhu’s already high healing is enough, a 4PC Maiden set can increase that even more, resulting in very overkill amounts of healing. Generally not recommended, but it can work.
 2PC HP/HB/ER:
If you’re struggling for artifacts, these are some 2pc sets that can work: HP% for his healing, shielding, and A4 Passive; Healing Bonus% for just his healing; and Energy Recharge% for getting his Elemental Burst back more consistently. Running a 2pc mixed set over a 4pc set isn’t much of a difference in team DPS, so if you don’t want to invest hugely in Baizhu, throwing high HP% pieces together can work just fine
Weapons
Authored by Leifa
Recommended
Jadefall’s Splendor
Baizhu’s Signature weapon, providing a large amount of HP% from its substat, as well as Flat Energy and Elemental DMG Bonus from the passive whenever he casts his Burst or creates shields. This synergises perfectly with his kit, getting him closer to maxing out his A4 Passive. Although he doesn’t make great use of the DMG Bonus, due to his already low personal damage, the flat energy lowers his ER Reqs immensely, providing up to 27 Flat Energy consistently.

A Thousand Floating Dreams
Despite being a more offensive catalyst, providing both Elemental Mastery and DMG%, it also provides 40 Elemental Mastery to the party, increasing Baizhu’s buffing potential. Due to not providing any Energy, players will most likely need to run an Energy Recharge% Sands to reliably Burst off cooldown. However, if players do have enough ER, this weapon becomes competitive with Jadefall in terms of team DPS, especially in teams that lack external EM buffs.

Prototype Amber
Basically a budget version of Jadefall, providing HP% from the substat, as well as Flat Energy and party-wide healing when casting his Elemental Burst. At R5, this will provide 18 Flat Energy, which still lowers his ER Reqs a lot. Due to Baizhu focusing fully on healing and Energy Recharge, the difference between these weapons isn’t major, meaning Amber is a very good F2P-friendly option for him.
Alternatives

Everlasting Moonglow:
An HP% stat stick, providing the same amount of HP% as Jadefall, as well as Healing Bonus. This may help players cap out Baizhu’s A4 Passive easier. However, there is still not much difference between the substats of Moonglow and Prototype Amber, making this weapon not that great.
Favonius Codex
The usual universal option for characters who either have high Energy requirements or don’t have a weapon they particularly prefer, providing Energy Recharge from the substat and Clear Particles from the passive. Favonius can help lower team ER Reqs, but Prototype Amber will generally help out more due to the large amount of Flat Energy it provides, assuming you need Energy in the first place. Also bear in mind that because Baizhu typically doesn’t equip CRIT Rate% Circlets, he might not proc Favonius’s passive consistently.
Hakushin Ring
A more supportive option, providing Energy Recharge from the substat and a team-wide Elemental DMG Bonus upon triggering an Elemental Reaction. If Baizhu can reliably trigger Quicken, this can be a nice alternative for both Aggravate and Spread teams, assuming Baizhu has enough Energy Recharge to reliably Burst every rotation.

Thrilling Tales of Dragon Slayers (R5)
A 3-star weapon, providing HP% from the substat and a large ATK% buff to the next character to take the field. Although the substat can help you max out Baizhu’s A4 easier, he may struggle to easily Burst due to not having enough Energy, requiring you to run an Energy Recharge% Sands as well.
Team Building
Authored by Leifa
Quicken
Baizhu | Electro | Electro / Dendro | Flex

For defensive options in Quicken teams, Baizhu competes strongly with characters like Zhongli and Yaoyao. Zhongli generally takes the place of an Anemo character, due to providing Universal Resistance Shred on top of immense comfort.
On the other hand, Yaoyao is able to keep the team healthy while providing enough Dendro application to easily sustain a Quicken aura if players are using their more prominent Dendro characters elsewhere. Baizhu is able to fill the same role of Dendro Applicator and healer while providing up to 40% Quicken Reaction DMG.
Unfortunately, his personal damage is rather poor and he can’t effectively build the CRIT or EM stats needed to provide meaningful Spreads to the team. Although Zhongli doesn’t do this either, his Universal Resistance Shred goes a long way in boosting the output of the team’s main damage dealers. Alongside Nahida, Baizhu can make a strong Double Dendro core, though it won’t be setting any DPS records.
Electro options: Keqing / Raiden / Fischl / Yae / Sara / Beidou
Dendro options: Nahida / Tighnari / Alhaitham / Collei / Dendro Traveler
Flex options: Anemo / Any above Electro / Any above Dendro
Hyperbloom
Baizhu | Electro | Hydro | Flex

Baizhu is also able to bring defensive utility to Hyperbloom teams. However, his role is more contested here due to the existence of Kuki, covering the roles of both Hyperbloom trigger and healer. If players find Kuki’s healing to not be enough, both characters can be ran together due to Kuki still being a strong Hyperbloom trigger. Alternatively, she can be replaced for Raiden, due to her frequent off-field Elemental Skill hits.
The main downside to Baizhu in Hyperbloom teams is his A4 Passive being effectively useless, due to only being applied to the on-fielder. It also only lasts 6 seconds at a time, meaning that it generally isn’t worth swapping to your Hyperbloom trigger just for the buff. If running Baizhu, players may also wish to bring a second Dendro character for consistent application, due to Baizhu’s Elemental Burst being single-target and applying a lot slower than Bloom Reactions can hit.
Electro options: Raiden / Kuki
Hydro options: Xingqiu / Yelan / Kokomi / Ayato
Flex options: Anemo / Dendro / Yae / Fischl / Any above Hydro
Quickbloom
Baizhu | Electro | Hydro | Flex

A variation on Hyperbloom teams that allows for both Quicken and Hyperbloom Reactions to be triggered simultaneously. For Quickbloom teams specifically, Baizhu’s main standout partner is Cyno, due to him utilizing both the Reaction DMG buffs from Baizhu’s A4 Passive as well as benefiting from the increased Interruption Resistance and more healing than current popular alternatives (such as Kuki). Baizhu’s staggered Dendro application can also be a benefit in multiwave content, due to not expiring once the first wave dies.
In Quickbloom, players have the choice to run a second Dendro for more consistent application, or a second Electro to capitalize on Aggravates and Electro Resonance. However, characters such as Cyno may have Energy issues in Double Dendro scenarios without multiple Favonius weapons.
Electro options: Cyno / Keqing / Raiden / Kuki / Yae / Fischl
Hydro options: Xingqiu / Yelan / Kokomi
Flex options: Anemo / Dendro / Any above Electro
Burgeon
Baizhu | Pyro | Hydro | Flex

Although Baizhu’s Dendro application isn’t great in AoE, he can be used as a defensive option in Burgeon teams, providing more comfort to players who aren’t comfortable playing Thoma on a full EM build as the only defensive option.
Despite this, Burgeon teams will generally still want a second Dendro character for consistent Dendro application, as well as enabling Dendro Resonance, increasing the overall EM of the team. However, like Hyperbloom teams, Burgeon teams also generally rely on an off-field trigger, making Baizhu’s A4 Passive effectively useless again.
Pyro options: Thoma
Hydro options: Ayato / Xingqiu / Yelan / Kokomi
Flex options: Anemo / Dendro / Bennett / Any above Hydro
Nilou Bloom
Baizhu | Nilou | Hydro | Dendro

In Nilou Bloom teams, Baizhu has his strength as an alternative to Yaoyao. Although his Burst application is relatively Single-target locked, it’s staggered over the duration of 14 seconds compared to Yaoyao’s Burst, which instead concentrates its AoE Dendro Application into a short period.
On top of large amounts of healing, he also provides shields, which may not be the largest, but still absorb Dendro DMG with 250% effectiveness, adding extra comfort and Interruption Resistance to the team. Finally, Baizhu also provides up to 100% Bloom Reaction DMG to teammates when healing with his Burst.
Due to the quickswap nature of Nilou teams, this buff can quite easily be applied to several party members in a rotation, increasing its usefulness. At the end of the day, he’s another defensive Dendro option that players can slot into Nilou teams over Yaoyao if they’d like.
Hydro options: Kokomi / Xingqiu / Yelan / Ayato / Candace
Dendro options: Nahida / Collei / Dendro Traveler / Alhaitham
Baizhu vs Nahida
Authored by Leifa
Baizhu Pros
- Strong, consistent healing from his Elemental Skill and Burst.
- Interruption Resistance from his small, refreshing shields.
- Quicken and Bloom Reaction DMG% buff, which doesn’t diminish alongside Elemental Mastery.
- Very easy to build due to not requiring many stats.
Nahida Pros
- AoE, consistent Skill DMG, providing 1.5U Dendro per application.
- Able to drive off-field characters with ranged, on-field Normal Attacks with decent AoE.
- Large Elemental Mastery buff, which affects all reactions.
- Good, staggered, off-field particle generation.
Analysis Due to both being 5-star Dendro Catalyst characters who also provide an Elemental Reaction buff through their passives, people will be quick to call Baizhu a “Defensive Nahida”. However, they are not interchangeable.
Burst Particle AoE :
For starters, Baizhu’s Elemental application is significantly weaker than Nahida’s. Due to Baizhu’s Elemental Burst projectiles being extremely small, they’re effectively single-target locked. This means that in AoE scenarios he will not only struggle to apply Dendro, but also consistently refresh Deepwood’s Resistance Shred. In comparison, Nahida’s Elemental Skill consistently applies Dendro to all enemies marked by her Skill, easily keeping Deepwood’s Resistance Shred active on all targets.
Dendro Application :
On top of this, Baizhu’s Elemental Burst application is only 1U, compared to Nahida’s 1.5U, meaning that as a solo Dendro unit, he won’t be enabling nearly as many reactions as Nahida. This is notable for teams such as Quickbloom, where your Quicken aura will not only be wiped out quicker, but fewer Bloom Cores will be created from it as well. On the other hand, this means his Elemental Burst hits will almost always be applying Dendro onto an Electro-Charged aura, resulting in both a Bloom Core and Quicken aura again. Unfortunately, this interaction isn’t enough for his application to allow for more Elemental Reactions off one Dendro aura compared to Nahida.
Buffing Teammates :
Thirdly, although Baizhu and Nahida both boost their teammates’ Reaction DMG through their passives, Baizhu’s buff is Quicken and Bloom Reaction DMG%, while Nahida’s is pure Elemental Mastery. This means that Nahida’s buff will be less effective when there are already other Elemental Mastery sources on the team. In contrast, Baizhu’s A4 does not suffer the same diminishing returns as EM does, making it better in situations where characters would already be building a lot of Elemental Mastery.
ER Requirements :
Finally, when being run as a solo Dendro unit, Baizhu’s ER Reqs are much higher than Nahida’s, who doesn’t rely as heavily on her Elemental Burst. This can result in players having to run not only Prototype Amber, but also even an Energy Recharge% Sands in extreme scenarios. Even though it’s not a great hit to his personal damage, it can be harder to build for, on top of all the other differences mentioned. In the end though, this doesn’t mean Nahida is “just better” than Baizhu. They perform drastically different roles and can’t truly replace one another in a solo Dendro scenario. However, when they are run together, Nahida and Baizhu cover each other’s weaknesses. Nahida provides strong off-field damage, as well as high Dendro application, and Baizhu provides large amounts of healing and defensive utility. To sweeten the duo, Nahida’s Elemental Mastery buff on top of Dendro Resonance means Baizhu’s Reaction DMG Bonus buff gives more Effective EM to the on-field character. Although they do drastically different things solo, when together, they create a strong Double Dendro core for teams to build around.
 Edit this page on GitHub
Enable hardware acceleration for the best site performance | Built using  and
and 
Wangsheng Funeral Parlor is in no way sponsored, endorsed or administered by or associated with miHoYo Co., Ltd.
