
Layla FAQ

Emiliabyss, Athena, EduLis, Tabune
Last updated on Jun 4, 2025
Credits:
- Emiliabyss#1641 - Consultant, Supervisor
- Athena#2444 - Mastersheet Author, Calcs, FAQ Author || ER requirement, Artifacts
- EduLis#2176 - Calcs, FAQ Author || Weapons, Talents, Overview, Constellations
- Tabbune#4201 - FAQ Contributor || Teambuilding
For all Layla Calcs you can reference: Layla Mastersheet by Athena and EduLis, and Layla Frames Mastersheet by Jrm.Spirit
DISCLAIMER Pre-TC is volatile and, as always, perpetually subject to change until release (and sometimes later!). Please note that these are theoretical suggestions. Everything described in this FAQ is a good faith analysis based on the little information about the character’s kit that we know. Team calcs, additionally, are not established yet, and as with everything in TC, the content in this FAQ should be taken with a grain of salt.
Character Overview
(Section authored by EduLis)

Layla is a Cryo 4-star sword-wielder who deals damage and creates shields based off of her HP stat. She requires very little on-field time to perform, therefore she pairs well with DPSs that require a lot of on-field time. Low energy requirements eliminate the need for a battery, making it easy to slot Layla into any team that needs her.
HP, ER, and 30% CRIT Rate or more (to proc Favonius passive) are most valuable to Layla. Due to her HP scaling, the ATK stat on weapons doesn't matter, meaning that she will perform when equipped with anything that offers a good enough ability or offers HP% or ER%. She is not picky when it comes to weapons, generally any sword with ER% or HP% substat or boost in the passive could be a good option for shield support build. Her build can skew towards shields or damage, but no matter what gear is used on Layla, her shield will be decent. However, the difference in builds between defensive and offensive options is minimal.
Layla’s constellations provide extra shield strength, ER requirement reduction, damage boosting for on-field character and more personal damage. C1 enhances her Shield Strength and grants all your co-op teammates with a shield identical in utility to your own. C2 restores energy with skill hits and eliminates her ER requirement , enabling her to build more HP. C4 provides Normal and Charged attack DMG to the character on-field, usually around 2k per NA or CA hit. C6 increase her overall damage and reduce the required time to stack up her Shooting Stars
Talents
(Section authored by EduLis)

Leveling priority: Skill > Burst >> Normal ATK
Analysis
HP scalers usually want to be level 90 to fully take advantage of the large amount of HP% gained through final ascension.
At face value her skill and burst are straight forward: her skill generates a cryo shield with 250% effectiveness against cryo attacks. It has a 12s duration and 12s cooldown, allowing 100% uptime. Her Burst summons a turret that shoots homing projectiles (Starlight Slugs) every 1.5s dealing DMG based on her HP. This is the majority of her personal DMG.
There is more to her Skill and Burst: The Night Stars/Shooting Stars. Whenever the shield is active, stack-like marks called the Night Stars are generated. They can be generated three ways:
- 1 Night Star is automatically generated every 1.5s
- If the on-field character uses their elemental skill, 2 Night Stars are generated. This has a 0.3s cooldown.
- When the Starlight Slugs from her burst hits, 1 Night Star will be generated. This has a 0.5s cooldown.
Through these methods, whenever four stars are accumulated, all of them will be consumed and shot out as Shooting Stars that deal damage. Expect around 12 Shooting Stars every shield duration. This process will be interrupted if her shield breaks at any moment.
Her passive talents are simple. Ascension 1 gives her stack-based extra shield strength based on the Night Star generation. And Ascension 4 grants her additive DMG onto her Shooting Stars. It is worth noting that even with this passive active, the Shooting Stars will still not be her dominant source of damage.
The over-world passive talent is quite nice as she gives 10% chance of doubling the product when crafting character talent materials.
Energy Recharge Requirements
(Section authored by Athena)
One thing to keep in mind is her Burst uptime. Having 100% uptime means she can either use it once in a 23 seconds or lower rotation, or up to twice in some 25 seconds rotations. It is tough to keep up with Bursting off cooldown in non-Cryo teams, since not catching any Cryo particles generated and investing that energy to other characters is more advantageous. With her Constellation 2 active, her ER requirement drops significantly, and so Bursting every 12 seconds becomes viable.

Artifacts
(Section authored by Athena)
Main Stats
Layla’s main role in a team is to provide a shield with her Skill as well as some off-field Cryo damage. With her shield being the main attracting point, the artifact main stats choices are quite straightforward.
Sands of Eon: HP% or ER%
Depending on team composition, ER% Sands can be used if you want to Burst off cooldown when Layla is the only Cryo character in the team. In other scenarios, HP% Sands is preferred to maximize her shield and damage from her Ascension 4.
Goblet of Eonothem: HP% or Cryo DMG%
Using a Cryo DMG% Goblet will let Layla deal 20% more damage at the cost of a 10% thinner shield.
Circlet of Logos: HP% or Crit
Both HP% and Crit circlet will perform comparably, while HP% allow a stronger shield and Crit one is more offensive. Substats will play an important role here, where Crit Circlet only leads by ~10% if both circlets have similar amounts of useful substats.
Sets
With how her Elemental Skill works, her best-ins-lot artifact set is arguably 4-piece Tenacity of the Millelith (TotM), providing ATK% and Shield Strength% to her team with a relatively high uptime. 4-pieces Noblesse Oblige is comparably effective if there are better units in the team that already utilize 4-piece TotM. Personal damage wise, 4-piece Blizzard Strayer and 4-piece Emblem of Severed Fate are the best choices, but considering her lackluster damage output, it is best to use the supportive options above.
You can consider 4-piece Instructor when using her in a team utilizing amplifying reactions like Vaporize and Melt to further buff the damage. Note that when using a 4 star artifact set, shield strength will be much lower compared to 5 star options, therefore a 5 star piece (preferably Sands) is much recommended.
Substats priority: ER% (until meet requirement) > CR (for Favonius proc) > CD = HP% > Flat HP > ATK%

Weapons
(Section authored by EduLis)
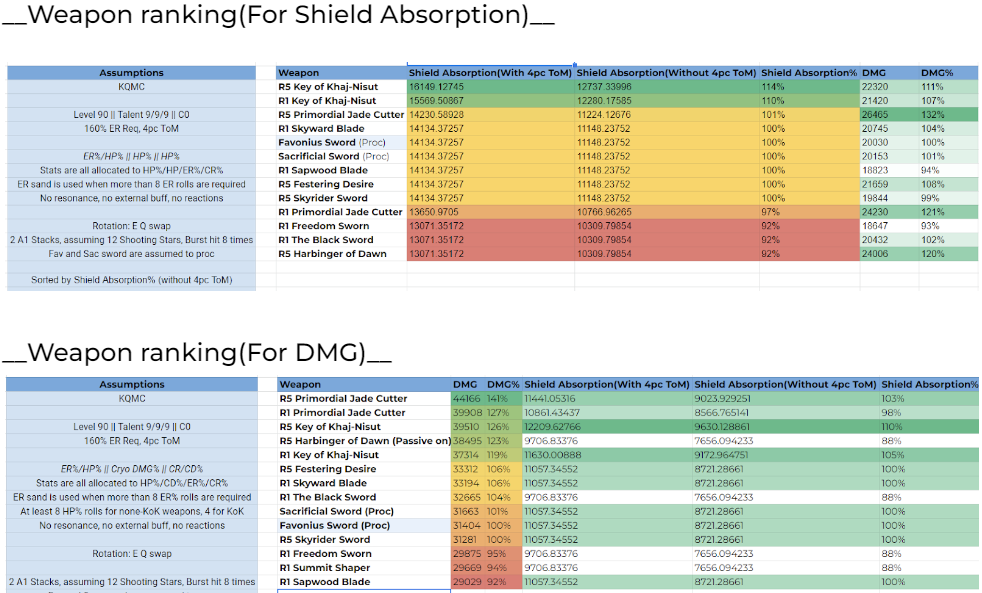
Her selection of weapons can be separated into two focuses: shield support or off-field DPS. And the ranking would vary since for shield support she would like as much HP as possible, while for off-field DPS, Crit would matter a lot more. The DMG gain from extra ATK is negligible, therefore weapons with ATK substat is not recommended.
The DMG gained/Shield Absorption lost or vice versa when switching build direction is not significant compared to other characters. Please reference Layla Mastersheet for detailed comparison.
For Shield Support builds, the difference between high-investment and low-investment shields is miniscule, meaning you can be liberal in weapon choice for this build. In that case, weapons with overall team support capabilities start to become more preferable, such as Key of Khaj-Nisut, Freedom Sworn and Favonius Sword.
For Off-field DPS builds, the standout performer here is Harbinger of Dawn. Being a 3 star weapon the low base ATK is less of an issue for Layla, and it provides plenty of Crit stats which she really benefits from. Her off-field nature also means she can take advantage of the passive very well, since there are few opportunities for Layla to take damage. Primordial Jade Cutter is also a strong option for her. For the rest of the options, weapons with ER% or Crit substats are preferable, and higher substat value is preferred over higher base ATK.
Teambuilding
(Section authored by Tabbune)
General Shielder
Layla can be a shielder in various comps with on-field characters that want the Interrupt Resistance (Melt Ganyu, Yoimiya, Cyno). On-field units that perform more skill casts can get more value out of Layla, as Layla gains 2 Shooting Star stacks every time your on-field character casts an Elemental Skill. Do note that in some teams, Layla’s Cryo application might interfere with Elemental application, such as in Melt Ganyu. This can be mitigated by not casting your Burst.
Freeze
-Layla/Cryo/Hydro/Anemo
Layla can be a more offensive alternative for Diona in Freeze teams where you want Diona’s battery capabilities and shielding. Layla provides defensive utility, Cryo energy generation, and the ability to hold support sets like 4ToTM, which is more valuable in teams that use 4BS. Freeze teams also help preserve Layla’s shield by making enemies unable to attack to break it, which allows you to get more Shooting Star triggers.
The main Cryo DPS in this team will generally be Ayaka or Ganyu, although you can run a unit like Rosaria or Kaeya as a budget alternative that can get more value out of Layla by playing in a quickswap combat style, getting more skill casts for Layla’s Shooting Stars.

Mono-Cryo
-Layla/Cryo/Cryo/Anemo
An alternative to freeze teams for enemies that cannot be frozen. Mono-Cryo teams work by stacking more Cryo units to synergize with each other by generating more Cryo particles, benefitting from the first half of the 4-piece Blizzard Strayer set bonus, and gaining more value out of Shenhe’s Icy Quills, which incentivizes you to run as many Cryo units as you can. Layla works well with Shenhe as she can use up the Icy Quill stacks quickly due to her multi-hit nature.
Though not recommended, players without Shenhe can opt to run Rosaria and/or Kaeya instead as a budget alternative, which synergizes well with Layla due to their low cooldown Elemental Skills.

Forward Melt
-Bennett/Layla/Anemo/Cryo, Anemo or Hydro
Layla’s Shooting Star mechanic rewards you for spamming Elemental Skills, and applies Cryo for Bennett to Melt his Elemental Skill. Using Bennett’s low-cooldown E allows Layla to get more Shooting Star stacks than normal, which improves Layla’s energy generation and personal damage.
An Anemo grouping unit is preferred for the third slot to provide VV and other team buffs and utility, while the last unit can be any off-field unit that will not interfere with the Cryo application needed for forward Melts, but a second Cryo unit is recommended for the increased Cryo application.

Eula
-Eula/Layla/Electro/Flex
Layla can be a defensive option in Eula teams, and still give offensive utility through her good uptime on 4TotM and a bit of personal damage. Due to Eula’s energy consumption timing, Layla can be a better battery for Eula because she generates her energy over time, instead of Diona’s upfront energy generation. The two last slots in the team are very flexible, though it is generally recommended to bring an Electro unit to trigger Superconduct for the Physical Resistance Shred.

Laylational
-Layla/Bennett/Xingqiu/Xiangling
Layla can be added as the flex slot in the National core to hold support sets like 4ToTM or 4Instructor and let Xiangling melt instead of vaping some of her Pyronado hits.

Fridge
Fridge teams are teams that use the interaction between Dendro and Cryo where both of them can co-exist on a target so applying Hydro onto the enemy will reduce the amount of Dendro consumed when triggering Bloom reactions while also keeping them frozen. These teams focus on increasing the amount of Blooms that you can trigger, which gives you more seeds that you can further react with by adding a Pyro or Electro character, or just using Bloom by itself, since Bloom will automatically explode when there are more than five on the field.
Layla is not recommended for some Fridge teams as Bloom damage will break her shield and stop her Cryo application, rendering her ineffective. However, this can be mitigated by using an Electro character to trigger Hyperbloom with the seeds, as Hyperbloomed seeds are less likely to damage your shield.

Constellations
(Section authored by EduLis)
DISCLAIMER: For explicit numbers on DPS increases, please refer to our linked Mastersheet for up-to-date numbers.
C1

Grants her a thicker shield with 20% extra shield strength. Also provides shields at 35% absorption of her own to nearby party members for 12s. This is especially useful in co-op and the uptime is very good. Rating: 3/5
C2

Generate 1 energy per Shooting Star hit. Within one duration of her shield 12 hits can be expected therefore dramatically reducing her burst ER requirement. This enables her to Burst off cooldown easily in Cryo teams and makes it viable in non-Cryo teams. Rating: 4 - 4.5/5
C3

Adds 3 more levels to her Skill. This boosts her shield absorption for another 20%. With her skill not being her main source of damage the gain here is negligible. Rating: 2.5/5
C4

When firing Shooting Stars, increase Normal and Charged Attack DMG based on Layla's Max HP. A decent bonus, becomes better with amplifying reactions. Rating: 2.5/5
C5

Adds 3 more levels to her Burst. Some extra damage however the gain is negligible given she will not be a major contributor to team damage. Rating: 1/5
C6

Shooting Stars and Starlight Slugs deal 40% increased damage. And Night Stars are automatically generated every 1.2s instead of 1.5s. It is hard to pull off another wave of Shooting Stars without sacrificing driver/carry’s on- field time. Rating: 3/5
 Edit this page on GitHub
Enable hardware acceleration for the best site performance | Built using  and
and 
Wangsheng Funeral Parlor is in no way sponsored, endorsed or administered by or associated with miHoYo Co., Ltd.
