
Arataki Itto

Emiliabyss#1641
Last updated for 2.4 on Jun 4, 2025
Abstract
-
Levelling: Level to 90. Level all talents to 9+. Normal Attack >= Burst > Skill
-
Constellations: C0 fine! C1 +2% | C2 +6% | C3 +3% | C4 +5% | C5 +10% | C6 +27%
-
Recommended Combos at C0:
- Q, N1, E, N3, SCA4, D, N4, SCA5, E || (Beginner-Friendly)
- Q, N1, E, N3, SCA5, D, N4, SCA5, E || (Same combo, but Ushi gets hit early)
- Q, N2/E, N4, SCA4, D, N4, SCA5, E, SCAF || (Advanced, but consistent)
-
Artifact Set: 4pc Husk of Opulent Dreams (Everything else is at least -10% DPS)
- DEF% / Geo% / Crit%
- Substat Priority: Energy Recharge (130-140%) > Crit% > DEF%
-
Weapons by Ranking:
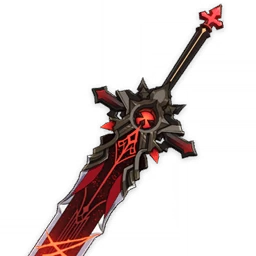
- Redhorn Stonethresher
- Signature, limited 5-star weapon || ~$200+?
- Serpent Spine (R1-R5)
- Battle Pass weapon, R5 + shielder approaches Stonethresher || ~$10
- Skyward Pride
- Non-limited 5-Star || Satisfies Energy Recharge needs || $???
- Blackcliff Slasher (R1-R5)
- 24 Masterless Starglitter in Paimon’s Bargains every other patch. || $0
- Whiteblind (R1-R5)
- Craftable; three prototypes available in open-world w/o RNG. || $0
- Redhorn Stonethresher
-
Teammates: Some combination of Gorou/Zhongli/Albedo + Flex
- Itto / Albedo / Gorou / Flex
- Itto / Ningguang or Geo MC / Zhongli / Flex
- Itto / Albedo / Zhongli / Gorou (ideally C4 for the mild healing)
- Flex: Bennet, Diona, Fischl, Geo MC, Ninnguang (depending on team needs)
Introduction
Itto is a character with many available attack combos, some of which are better in particular circumstances than others. As such, Itto is a character that rewards adaptability, based on the many factors that alter his damage. He is playable for beginners and improves in damage the more skilled you become with his attack strings. He is also the premier 5-star Geo DPS at the time of writing this.
What is Itto's role in a team?
Itto is a Geo-based hypercarry, requiring the most resources and field time out of any other team role. This means that you should level Itto to 90 (especially due to Itto’s DEF scaling) and raise his talent levels to 9 or 10. In exchange, Itto deals massive damage. Teams utilizing Itto will primarily be off-field supports that take little time on-field to do their job and boost Itto’s effectiveness in some way, either by increasing his damage output or by satisfying his needs to function, such as his ER% requirement to keep Itto's Bursts coming.
Itto’s rotations are focused on ensuring Itto can use his Elemental Burst, which converts his DEF stat into ATK. When in his Burst mode, after factoring in hitlag, you have between 11 and 14 seconds to deal as much damage as possible with his Stacked Charged Attacks (SCA).
Hypercarries typically are locked into a few specific team comps, making Itto inflexible for team building. You basically always want Albedo, Zhongli, and/or Gorou on any team. Because Itto is of the Geo element, you can’t make use of amplifying elemental reactions with him, making him synergize mainly with other Geo characters. He is heavily dependent on pure multiplier and offensive stats to perform rather than cheating the damage charts with reactions.
One could, in theory, opt into Chongyun or C6 Bennet to try and encourage amplifying elemental reactions with Itto on a Cryo or Pyro goblet, but when in Itto’s Burst mode, his attacks stay as Geo. This would effectively render the most important aspect of Itto’s kit, his Elemental Burst, useless.
Pros and Cons

Benefits
-
Capable of dealing strong, consistent Geo damage, with a very high damage burst in every rotation. Basically, he has high multipliers.
-
Itto provides both simplicity and depth in his kit, creating a short barrier to entry and room to improve his combos. Specifically, playing Itto well will teach you how to play within tight time frames.
-
Geo, like Physical carries can be used in a wider variety of situations, due to having few enemies immune to Geo.
-
Cheap and effective weapon alternatives; three of the top 5 weapons for Itto can be acquired either through Battle Pass or are entirely free.
-
Surprisingly good AOE and range of attacks while in Burst mode.
-
Constellations are not required for Itto to perform at a satisfying level.
-
A low-budget battery support for Itto is Geo MC, which every player has.
-
High interruption resistance protects your DPS window while in Itto’s Burst mode.
-
Itto beatboxes for you on your birthday.

Drawbacks
-
Needs quite high resin investment (hyper investing) to get a competitive state; Itto must be levelled to 90 and all of his talents need attention.
-
Barely functions outside of his Burst; energy requirements must be satisfied.
-
You’re basically required to farm 4pc Husk of Opulent Dreams or suffer a 10%+ DPS penalty.
-
Strict team compositions restrict Itto’s flexibility, and hurt your ability to deal with team weaknesses.
-
If you have C6 Noelle, you’re probably not going to be very motivated to play Itto.
-
Itto teams in general will struggle breaking elemental shields.
-
Itto’s best teammates, Zhongli and Albedo, are 5-star characters.
-
Cannot take advantage of elemental reactions.
-
Itto beatboxes for you on your birthday
C0 Itto vs C6 Noelle
THIS IS A WIP; WAITING ON TEAM CALCULATOR TO BE FINISHED
Itto and Noelle have a very similar playstyle: both rely entirely on their Burst to do damage, both infuse their Normal, Charged, and Plunge attacks with Geo, and both scale based off of DEF, adding their DEF to ATK during their Bursts.
The reality is, both are Geo, claymore-wielding Main DPS’s that require a 4pc Husk of Opulent Dreams to reach their maximum potential. They also fight for the same weapons.
For this reason, those who have already hyper-invested into Noelle may not benefit much from rolling for Itto, as you’ll need to level up Itto with lots of EXP and Talent books. This might just be too much work and too much money for a 5-star upgrade.
Please note that a character is only as good as their team comp’s damage, and much more math is to-be-done.
| Category | C0 Itto | C6 Noelle |
|---|---|---|
| Difficulty to Acquire | Limited 5-Star | Free 4-Star ✔️ |
| Ease of Constellations | N/A if comparing C0 ✔️ | Inevitable ✔️ |
| Ult Uptime | 11 Seconds, 18 Second CD | 100% IF heavily batteried |
| Energy Needs | 130%+ ER | 130%+ ER |
| Energy Generation for Self | 3-4 Particles per E. ✔️ | Cannot generate energy. ❌ |
| Unique Team Benefits | Same as Noelle, except… | Benefit by Yunjin ✔️ |
| Damage w/ Same Team | ✔️ | ❌ |
| Ascension Stat / Build Ease | Crit Rate% ✔️ | DEF% ❌ |
| Team Needs | Shields / Heals…? ❌ | Provides shields / heals ✔️ |
| Misc. | Will let you join his gang. | Will clean your house. |
Character Overview
Itto’s playstyle is heavily based on:
- Using his Burst to enhance his Normal and Charged Attack damage based on his DEF.
- Building as many Superlative Superstrength stacks as possible through Normal Attacks, then…
- unleashing the longest possible Stacked Charged Attack combo.
- Repeat steps 2 and 3 until end of Burst duration.
Itto’s kit depends entirely on his Superlative Superstrength stacks, his StackedChargedAttacks, and his Elemental Burst. His Elemental Skill does impressive damage while boosted by his Burst mode. As a result, all of his talents are important to level as high as possible.
Like Noelle, Itto is dependent on his Burst to deal damage. Outside of his Burst, using normal attacks, even to build up Super Strength stacks in advance, is a DPS loss for your team. Itto, unlike Noelle, will deactivate his Burst mode upon switching out.
What follows is a detailed review of each component as his kit.
Active Talents
Normal Attack: Fight Club Legend
Talent Priority: #1

Normal Attacks
Perform up to 4 consecutive strikes. In Burst mode, all attacks give 1U Geo.
Frame Data (Burst Mode) Recorded in 60 FPS
| Attack Type | Number of hits/input | Execution Frame |
|---|---|---|
| N1 | 1 | 37.80 |
| N2 | 1 | 44.33 |
| N3 | 1 | 47.75 |
| N4 | 1 | 43.25 |
When the 2nd and 4th strikes hit opponents, Itto will gain 1 or 2 stacks of Superlative Superstrength, respectively. Max 5 stacks. Each stack lasts for 60 seconds. Each new stack refreshes stack duration.
- When in Burst mode, the 1st and 3rd strikes will also grant one Superstrength stack each. An N4 attack string in Burst mode results in the maximum of five stacks.
- Itto's Normal Attack combo does not immediately reset after sprinting or using his Elemental Skill, "Masatsu Zetsugi: Akaushi Burst!" This is especially important to consider when getting into combos.
- The transparent oni mask behind Itto gives a visual cue of the number of Superlative Superstrength Stacks. The spots light up in this order: right eye, left eye, below the nose, nose bridge, and forehead. When you have all five stacks, the whole mask will glow.
- It is not recommended to use Normal Attacks to build Superstrength Stacks outside of his Burst mode.
Charged Attacks
Using Charged Attacks consumes Superlative Superstrength stacks to perform more powerful attacks that don’t consume stamina: Arataki Kesagiri (AK) slashes. When the final stack is consumed, Itto delivers a powerful finishing slash. In Burst mode, all attacks give 1U Geo.
- Each Arataki Kesagiri slash consumes 1 stack of Superlative Superstrength.
- If no stacks of Superlative Superstrength are available, Itto will perform a single Saichimonji Slash. Saichimonji slashes are never recommended for maximizing damage.
The individual hits will be abbreviated to AK followed by the numbered placement in the combo. See the chart below.
Frame Data (Burst Mode) Recorded in 60 FPS
| Attack Type | Number of hits/input | Execution Frame |
|---|---|---|
| Arataki Kesagiri 1 (AK1) | 1 | 53.80 |
| Arataki Kesagiri 2 (AK2) | 1 | 33.80 |
| Arataki Kesagiri 3 (AK3) | 1 | 31.30 |
| Arataki Kesagiri 4 (AK4) | 1 | 31.20 |
| Arataki Kesagiri Finish (AKF)* | 1 | 35.29 |
| Saichimonji Slash | 1 | 76.50 |
* This data factors in the attack speed buff from Itto’s first Ascension Talent, which increases each consecutive AK slashes' attack speed at 10%; max 30%. It is never advisable to [N1+AKF / N1+SCAF]-spam. Without this attack speed boost, AKF takes about twice as long to execute, significantly lowering DPS.
Plunging Attacks
Plunges from mid-air to strike the ground, damaging opponents along the path and dealing AoE DMG upon impact.
Not much to say about this. It’s your average plunge attack. Itto’s Plunging Attacks don’t always receive (all) the same buffs from Itto’s kit as Normal Attacks and Charged Attacks do. Dragon Striking is possible with Itto; whether this is worth the technically demanding play may come in a future update to this guide.
Elemental Skill: Masatsu Zetsugi: Akaushi Burst!
Talent Priority: #3

Throw a cow (Ushi) at your opponents, dealing Geo Damage. Ushi stays on the field for 6 seconds, taunting surrounding enemies and drawing attacks. Its HP is equal to Itto’s. Holding the skill allows you to adjust your throwing angle (up to 6 Abyss tiles of distance). Ushi vanishes after 6 seconds or when Ushi’s HP is reduced to zero, whichever happens first.
In-depth attributes
Frames are recorded in 60 FPS
| Type | Attributes | Data |
|---|---|---|
| Tap | Cooldown | 10 seconds |
| Particle/cast | 3.5 (1:1) | |
| Particle/min | 21 | |
| Execution frames | 39 | |
| Elemental Gauge | 1U Geo | |
| Count as Geo Construct? | Yes |
This skill deals an impressive amount of damage, and using it twice during every Burst will help maximize DPS: once near the beginning, once near the end.
There are multiple ways Itto’s Elemental Skill can grant stacks of Superlative Superstrength, regardless as to whether Itto is on or off-field:
- When Ushi hits opponents, Arataki Itto gains 1 stack of Superlative Superstrength.
- When Ushi takes DMG, Arataki Itto gains 1 stack of Superlative Superstrength. One stack can be gained in this way every 2s.
- When Ushi leaves the field, Arataki Itto gains 1 stack of Superlative Superstrength.
One can safely assume Ushi will be hit at least once, meaning Itto’s first combo in your rotation won’t need to use a full N4 string.
Elemental Burst: Royal Descent: Behold, Itto the Evil!
Talent Priority: #2 (nearly tied for #1)

Pull out a war club and clobber your enemies!
-
For (at least) 11 seconds, Itto’s Normal, Charged, and Plunging Attacks are converted to Geo damage. 1U of Geo is applied per hit. Hitlag can extend Itto’s Burst duration.
-
When in Burst mode, the 1st and 3rd strikes will grant one Superstrength stack each. An N4 attack string in Burst mode results in the maximum of five stacks.
-
A large portion of your DEF is added to your attack, depending on the Burst’s talent level. Normal Attack speed is also increased.
- 97.92% of DEF at level 9
- 103.68% of DEF at level 10.
-
Decreases Itto's Elemental and Physical RES by 20%.
-
Attack speed is increased by 10%.
-
Itto’s Burst snapshots his DEF stat.
- If running Whiteblind as the F2P option for him, it’s good to get at least one of Whiteblind’s stacks before bursting. Don’t overdo it, as spending too much time before your burst extends your rotation time and reduces overall DPS.
-
Leaving the field deactivates Itto’s Burst.
This is by far the most valuable part of Itto’s kit. It makes his impressive DEF scaling matter, and is the reason Itto can deal the damage he does, similar to 4-star Noelle. You should be attacking with Arataki Itto almost exclusively while his Burst mode is active.
Its importance also highlights a shortcoming of Itto: his need for Energy Recharge%. Itto needs at least 130% ER to be able to burst off cooldown, depending on teammates. 140% is ideal to guarantee bursting off cooldown consistently.
Passive Talents
First Ascension Passive: Arataki Ichiban

Each Arataki Kesagiri slash increases the ATK SPD of the next consecutive slash by 10% and increases his resistance to interruption.
Max ATK SPD increase is 30%. These effects clear once Itto stops performing consecutive Arataki Kesagiri slashes.
This passive talent makes Itto’s charged attacks even better. The interruption resistance is massive, allowing you to keep swinging even through a spinning Ruin Guard (Itto can receive up to nine hits before being interrupted). The attack speed boost is part of what makes Stacked Charged Attacks so important for Itto.
The finishing Arataki Kesagiri slash is strong, but pays for it in frames. By the time you hit +30% attack speed, you mitigate most of the weaknesses of the finishing combo slash and then can dash, use your Skill, or swap out immediately after hitting.
What does this mean in terms of gameplay?
Basically, the finishing slash benefits the most from at least three Stacked Charged Attacks before it, meaning four stacks of Superstrength is the minimum to maximize the finishing slash’s potential.
Fourth Ascension Passive: Bloodline of the Crimson Oni

Arataki Kesagiri DMG is increased by 35% of Arataki Itto's DEF
This is a flat increase to damage before multipliers from damage bonuses are factored in. It’s further motivation to build DEF and makes you hit harder. Pretty straightforward.
Utility Passive: Woodchuck Chucked

When a party member uses attacks to obtain wood from a tree, they have a 25% chance to obtain an additional log of wood.
Quality-of-life bonus for those who like decorating their Serenitea Pot.
Burst Combos
Itto cannot maintain his Burst after switching, so once Itto activates his Burst, the only option to maximize damage is to make the absolute most of his kit for the 11+ second duration.
The notation we’ll be using to describe pieces of the combo will go as such:
| Notation | Translation |
|---|---|
| N#* | Number of normal attacks in a single combo. |
| E | (Elemental) Skill |
| Q | (Elemental) Burst |
| D | Dash |
| SCA# | Number of Stacked Charged Attack/Arataki Kesagiri slashes, including the finishing slash. |
| SCAF | Only one Stacked Charged Attack/Arataki Kesagiri slash: the finishing slash. |
*Since Itto’s Normal Attack combo does not reset when using dashes or his Skill, assume that if you see something like “N1, E, N3,” it means “one Normal Attack, Skill, two more Normal Attacks.”
For many, Itto’s combos appear simple: get five stacks of Superlative Superstrength, use those stacks, and use his Elemental Skill when you can. This is partially true, but you can get even more out of your damage by following the recommended combos prescribed here.
What follows is an explanation of the most important combos to consider. For a full list of tested combos and the assumptions behind the math, please refer to Wangsheng Funeral Parlor’s Itto Mastersheet.
C0 Recommended Combo V1 (95.61%):
Q, N1, E, N3, SCA4, D, N4, SCA5, E
Combos will, predictably, (almost) always start with Itto’s Burst. Remember that dashing and using his Skill does not reset his normal attack string. This combo deals the most damage for the lowest required technical play, ranking in our sheet as 95.61% of the standard we want to set.
-
Itto’s N4 takes a while to hit, so circumventing the long animation is important for maximizing the time.
-
N1, E, and N3 collectively grant Itto four stacks of Superlative Superstrength.
- Ushi, when hit, can grant another stack, bringing Itto to five.
C0 Recommended Combo V2 (99.3% - Ushi Hit / Prior Stack):
Q, N1, E, N3, SCA5, D, N4, SCA5, E
This combo can only be used if Ushi is hit or if a stack is pre-built, leftover from a previous rotation.
A single Ushi hit raises the power ranking to99.3% of the standard we want to set.
- You might note the original recommended combo uses Itto’s Skill at the end, which usually will generate at least one stack of Superlative Superstrength for hitting an enemy. This means that you can comfortably repeat this combo after the first rotation.
C0 Recommended Combo V3 (100%):
We consider the strongest, but most challenging version of the recommended combo, from first rotation on, to be the following:
Q, N1, E, N3, SCA4, D, N4, SCA5, E, SCAF
This combo sets the bar for damage efficiency at100%. What makes this combo slightly more powerful than the previous combo is the finishing slash at the end. It is challenging because it requires exceptionally tight play: knowing how to minimize as many frames as possible through well-timed dashes and E-ing out of N1 at the right time.
There is a caveat, however. Just like how V2 either requires Ushi getting hit or having a pre-built stack from a previous rotation, V3 requires Ushi**not** getting hit. The fifth SCA in the first half of the combo would make it impossible to fit the SCAF in at the end. The good thing about this caveat though, is that you only lose 0.7% damage if Ushi gets hit, demoting the combo to V2.
C0 Technical Combos (100.48%-101.6%):
Some may have detected before this section that we were leaving out an important technical skill unique to Itto: one that exploits the fact his Normal Attack string doesn’t reset allowing one to cheat max stacks.

This is referred to as the “Dasshu” by IttoMains (see their Combo Mastersheet above), and takes advantage of the second Normal Attack’s delay before hit. Basically, before the second Normal Attack hits, you either use your Skill or you Dash forward, cancelling the animation (thus making Normal Attack 2 not hit), then immediately resume the Normal Attack string all the way to N4. Keep in mind that doing this causes the second Normal Attack to not hit.
The reason this is advantageous is because while the fourth Normal Attack takes the longest to hit, it grants double the stacks of Superlative Superstrength.
- By cancelling with Itto’s Skill, you can always reach maximum stacks by hitting with Normal Attacks only three times.
- By cancelling with Itto’s Dash, you can reach four stacks with three Normal Attacks.
- You can “Dasshu” any Normal Attack of Itto’s except the fourth. The first is also inadvisable.
There are two notable combos that beat the C0 Recommended Combo in terms of damage.
Q, N2/E, N4, SCA5, D, N4, SCA5, E (100.48%)
This combo can be used on any rotation.
Q, N2/E, N3 SCA5, D, N4, SCA5, D, E, SCAF (101.06%)
This combo can only be used if two stacks are pre-built, leftover from a previous rotation.
Both combos are similar to the recommended combos above, only substituting N1, E, N3 for [N2/E, N4] or [N2/E, N3].
"Once this technique is mastered, these rotations become the new strongest consistent combos."
C0 The Current Strongest Combo
Currently, there exists one C0 combo that tops even these technical combos, without the use of “Dasshu.” However, it also depends on a pre-built stack from a previous rotation or Ushi getting hit.
Q, N1, E, N3, SCA5D, N3, SCA4D, N1, E, SCA2 (101.70%)
This combo can only be used if Ushi is hit or if a stack is pre-built, leftover from a previous rotation.
This is the strongest C0 we’ve measured so far, without assuming more than one Ushi hit or pre-built stacks. Even then, the difference in damage from this combo (including its caveats) and our recommended combo (V2 or V3) is under 2%.
Combo Conclusions:
Beyond the recommended combo (V2/V3), the difference between V3 and all other combos is ~1% damage, which is not significant. Even with C1 combos (which we’ll get to when talking about constellations), the difference goes up to 3%; hardly a noteworthy DPS increase for the price it takes to C1 a five-star character. C6, of course, will be a different story.
Some people may be unsatisfied with this, whereas I believe (excusing C1) this is good design: Itto’s combos are adaptable, and allow you to deal comparable damage in all sorts of situations, so long as you follow some basic principles:
- Use Itto’s Skill near the beginning and the end of his Burst.
- Build at least four stacks of Superlative Superstrength before each SCA combo.
- Dash after every SCA finish to save frames/time.
For more notes on various combos and their DPS placements, please refer to our Itto Mastersheet.
Constellations
Rolling for one copy of a 5-star unit is already expensive. My advice is to roll for constellations only based on your financial situation and level of disposable income. Itto does not require constellations to function, and is fine at C0. The most noteworthy constellation is, of course, C6, but this requires thousands of dollars (or once-in-a-lifetime luck) to acquire.
That said, each constellation does benefit him, but whether each constellation is worth the ~80-160 summons is up to you.
Constellation 1: Stay a While and Listen Up

After using Itto’s Burst, Itto gains 2 stacks of Superlative Superstrength. After 1s, Itto will gain 1 stack of Superlative Superstrength every 0.5s for 1.5s.
DPS increase from C0: ~2.27%
Itto’s C1 should be interpreted as “When Itto uses his Burst, he gains the maximum number of Superlative Superstrength stacks.” There’s a tiny window in which one could exploit the gradual gain of these stacks by having them replenish as they’re depleted by Stacked Charged Attacks, but this is barely a DPS increase, even after factoring in the new combo.
The strongest combo at C1 for damage and consistency is:
Q, E, SCA7, D, N4, SCA5, D, E, SCAF (103.32%) Combo courtesy of the theorycrafting team at IttoMains. Itto Combo Mastersheet
C1 should instead be understood as a quality-of-life upgrade, expanding the number of methods to reach comparable damage during Itto’s burst.
Constellation 2: Gather 'Round, It's a Brawl!

After using Itto’s Burst, each party member whose Element is Geo will decrease that skill's CD by 1.5s and restore 6 Energy to Arataki Itto.
CD can be decreased by up to 4.5s in this manner. Max 18 Energy can be restored in this manner.
DPS increase from C1: ~5.82% || from C0: ~8.22%
The reason C2 adds more to Itto’s DPS than C1 is that it allows Itto to focus less on building Energy Recharge% in his substats, leaving more room for Critical Rate%, Critical Damage%, and DEF%. You’re likely using three Geo characters in a single team anyways when using Arataki Itto as your hypercarry, so getting a free 18% refund and possibly an extra Skill use is great.
Constellation 3: Horns Lowered, Coming Through

Increases the Level Itto’s Skill by 3. Maximum upgrade level is 15.
DPS increase from C2: ~2.80% || from C0: ~11.25%
Throwing cow hits hard. Throwing cow hits harder now.
Constellation 4: Jailhouse Bread and Butter

After Itto’s Burst mode ends, all nearby party members gain 20% DEF and 20% ATK for 10 seconds.
DPS increase from C3: ~4.85% || from C0: ~16.64%
This constellation is a free 4pc Noblesse buff on a typical team, but with teammates that scale off of DEF like Albedo, this is even better.
From the second rotation on, Itto snapshots this buff when using his Burst, assuming your team’s rotation is ~20 seconds.
Constellation 5: 10 Years of Hanamizaka Fame

Increases the level of Itto’s Burst by 3. Maximum upgrade level is 15.
DPS increase from C4: ~10.26% || from C0: ~28.61%
No surprise here. Nearly all of Itto’s damage comes from using Normal and Charged attacks during his Burst mode. High Burst = high damage.
Constellation 6: Arataki Itto, Present!

Arataki Itto's Charged Attacks deal +70% Crit DMG. Additionally, when he uses Arataki Kesagiri, he has a 50% chance to not consume stacks of Superlative Superstrength.
DPS increase from C5: ~26.52% || from C0: ~62.71%
The “Unga Bunga Superstar” constellation. The 70% Crit DMG boost is absolutely massive. With each Stacked Charged Attack having a 50/50 chance to keep its Superstrength stack, it is possible for a SCA combo to “go infinite” (until Itto’s Burst ends).
The downside of this Burst is that you can no longer predict how long each SCA combo will go on for, but the massive Crit DMG boost makes this drawback irrelevant.
Throw your luck to the throes of chaos and pray that God chooses you.
A C6 combo might look something like the following:
Q N1 E SCA12 D N2 SCA4 E (162.73%)
Equipment & Gear
Don't underestimate the beetle — they can be some of the toughest little guys around! Wanna know what's on this beetle's diet? Sweat and tears, that's what! That's how it gets STRONGER!!! I think we can all learn somethin' from that!
Artifact Sets
For full details on Artifacts, please refer to our Itto Mastersheet.
| Artifact Sets | Notes |
|---|---|
 4pc Husk of Opulent Dreams (100%) 4pc Husk of Opulent Dreams (100%) | The undisputed BiS for Itto, and it’s not close.Max buffs from this are 54% DEF, 24% Geo%: 30% DEF from 2pc bonus 24% DEF and Geo DMG (4 stacks) Itto snapshots the DEF% (but not Geo DMG%). |
 2pc Husk || 2pc Archaic Petra (90.56%) 2pc Husk || 2pc Archaic Petra (90.56%) | Strictly worse than 4pc Husk by ~10%.4pc Husk at best gives 54% DEF & 24% Geo DMG2pc Husk/2pc Petra at best gives 30% DEF and 15% Geo DMG. Use only if substats are insane. |
 4pc Retracing Bolide (90.40%) 4pc Retracing Bolide (90.40%) | Almost identical to the 2pc Husk/2pc Petra build.Still strictly worse, but also requires a shielder at all times. |
  Any Glad/Reminiscence Combos (86.43% maximum) Any Glad/Reminiscence Combos (86.43% maximum) | Itto does not scale well with ATK%, so Itto benefits little from any combination of Gladiator’s Finale or Shimenawa’s Reminiscence. Not recommended. |
 2pc Husk || 2pc Defender’s Will (84.29%) 2pc Husk || 2pc Defender’s Will (84.29%) | One might think that two 30% DEF bonuses would be enough to compare with Husk. This is deceptive; since Defender’s Will is only a 4-star, we lose out on two substat rolls and 79 ATK, which factors in more than one would think. |
Mainstats and Substats
Sands: DEF%
Itto’s Burst, fourth ascension talent, and signature weapon all care about Itto’s DEF stat, and with Itto’s Burst adding all of your DEF to your attack, there is no excuse to not go with DEF% for your sands.
It is not recommended to use Energy Recharge% or ATK%; Itto’s Energy Recharge requirements should be satisfied with substats alone. The only reason to not use a DEF% sands would be if you’re building an Itto that, for some reason, chooses to forsake his Burst (the equivalence of ~2 Bennet buffs) in favor of a meme build (such as pyro/cryo-infusion).
Goblet: Geo DMG%
Most of Itto’s damage is through his Geo infusion and his powerful cow-throwing skill. As such, a Geo DMG% Goblet is the best fit for him. The only reason to deviate from this would be for the reasons above – a meme build.
Circlet: Crit Rate%/ Crit DMG%
As always, Crit is king for non-reaction carries. Choose whatever Crit mainstay that helps you balance a 1:2 crit ratio, and take substat into consideration as well. Normally the choice depends on the weapon and substats.
- If you have a Crit Rate% weapon, then usually Crit DMG% the correct choice
- If you have a Crit DMG% weapon, then usualy Crit Rate% is the correct choice.
- If Itto’s weapon has neither of these kinds of weapons, then go with whatever will get you to a 1:2 ratio of Crit Rate%:Crit DMG%. (Start by aiming for 75CR% : 150CD%)
Substats priority is as follow:
- ER% (until you can comfortably burst off cooldown – 130%-140%)
- Crit DMG%/Crit Rate%
- DEF%
Make sure to take good care of Itto’s Crit Rate%; you’re not going to be able to crit fish with a character who needs to hit many times in a row to do damage.
Weapons
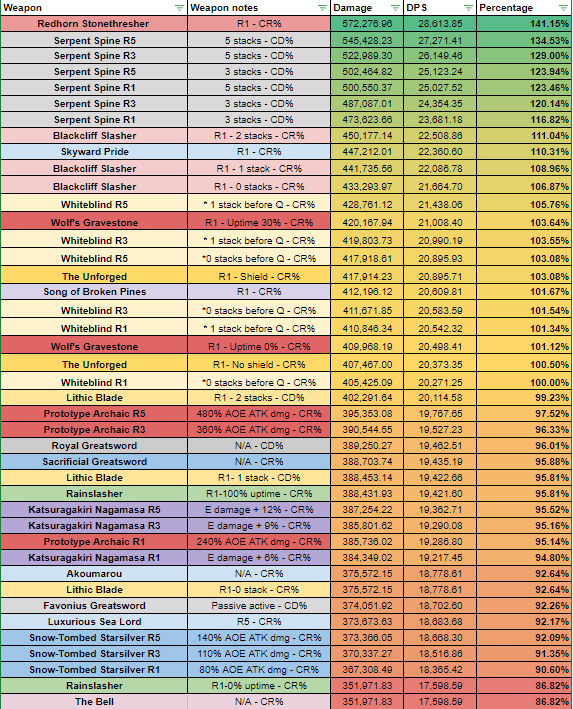
I review every weapon on this list below, but if you don’t want to bother yourself reading all of my evaluations, you can just refer to this ranking list on this page.
Itto’s Weapon Rankings
Simulated with Lv 90 Itto, Level 9 Talents, 4pc Husk of Opulent Dreams (full stacks).
DEF% / Geo% / Crit% || 20 sub rolls with priorities: ER% > Crit% > DEF%
Gorou 9/9/9 buffs, Geo resonance, Noblesse Oblige 4pc bonus
Rotation: Q, N1, E, N3, SCA4, D, N4, SCA5, E, SCAF
VS Lv 100 Hilichurl || ER 140%
In-depth Weapon Analysis In Power Order:
Assume 5-star weapons are at R1
| Weapon | Notes |
|---|---|
 Redhorn Stonethresher (141%) Redhorn Stonethresher (141%) | Itto’s limited-time signature weapon. It is consistent, has no caveats, and does everything Itto would want in a weapon: – 88% Crit DMG; on par with Jade Cutter’s Crit Rate% – 28% DEF% buff, further enabling his DEF scaling – adds 40% of DEF to Normal / Charged Attack DMG The difference between r1 Serpent Spine and Redhorn is equivalent to the difference between C5 and C6 Itto. |
 Serpent Spine (R1-R5) (116%-134%) Serpent Spine (R1-R5) (116%-134%) | A $10 Battle Pass weapon that outclasses all other 5-star weapons on Itto, regardless of Serpent Spine’s refinement level. Serpent Spine is often considered the best 4-star weapon, but on Itto, it is even more disproportionately good. To reach max potential, refine to R5, have a shield on at all times, and before a fight, wait for all stacks to build. |
 Skyward Pride (110%) Skyward Pride (110%) | A 5-star weapon that can be pulled on any banner. The Energy Recharge stat on Skyward Pride allows you to forgo building ER% in substats entirely. The damage from Skyward Pride’s passive also benefits from Itto’s Burst, dealing much higher damage than one would normally expect from this weapon. |
 Blackcliff Slasher (R1) (107% - 111%) Blackcliff Slasher (R1) (107% - 111%) | A Crit DMG% weapon that can be bought with 24 Masterless Starglitter; basically free. At two stacks, it beats Skyward Pride for damage, but that requires killing enemies; not great for single-enemy runs like boss fights. Without any stacks, it still beats craftable R5 Whiteblind with one pre-built Whiteblind stack before Itto’s snapshot. |
 Whiteblind (R1-R5) (100% - 105%) Whiteblind (R1-R5) (100% - 105%) | The true F2P weapon for Itto; craftable with three prototype billets obtainable in open-world (at time of writing) without having to worry about boss drops. The bare minimum and standard for all other weapons for Itto. It performs at the same level as Wolf’s Gravestone with WGS passive active and costs $0.To maximize potential, pre-build one Whiteblind stack before entering Itto’s Burst (more may result in DPS loss). |
 Wolf’s Gravestone(101% - 104%) Wolf’s Gravestone(101% - 104%) | Comparable to Whiteblind, but is a 5-star and costs money to acquire, hence the lower ranking. Wolf’s Gravestone underperforms because of Itto’s poor ATK scaling. Even with everything Wolf’s Gravestone gives, even when its passive is active, it still can’t beat a $0 weapon. Give this weapon to someone who will get more out of it. |
 Song of Broken Pines (102%) Song of Broken Pines (102%) | Itto cannot make use of the Phys DMG% mainstat on the weapon, hurting its viability. The passives aren’t terrible on him, but again, two free weapons and a Battle Pass weapon (all at R1) outclass it. |
 The Unforged (101% - 103%) The Unforged (101% - 103%) | The Geo lego weapon might look cool on Itto, but it suffers the same issue that Wolf’s Gravestone does, and requires a shielder at all times. |
 Lithic Blade (R1)(93% [0 stk] - 99% [2 stk]) Lithic Blade (R1)(93% [0 stk] - 99% [2 stk]) | Getting even two stacks is difficult for Itto, as Itto himself is from Inazuma and another valuable support, Gorou, is also from Inazuma. Zhongli and Ningguang are from Liyue, but Albedo, Diona, Fischl, and most other support options for Itto are not. R5 Lithic with 2 stacks = R1 Serpent Spine with 3 stacks. |
 Prototype Archaic (R1-R5) (95% - 97%) Prototype Archaic (R1-R5) (95% - 97%) | Either you crafted the wrong item, or you crafted this for another character, they grew out of it, and it became a hand-me-down for Itto. At least it’s free. |
 Royal Greatsword (R1) (96%) Royal Greatsword (R1) (96%) | Royal Greatsword is mainly good when you’re not invested in Crit Rate (but you should be). The effective Crit Rate% gain is on average ~4%. Mainly just an ATK mainstat claymore. Not worth your starglitter. |
 Sac. Greatsword (R1-R5) (96% - 117%*) Sac. Greatsword (R1-R5) (96% - 117%*) | At R1, this is like Royal Greatsword, with the bonus of having to worry less about Energy Recharge substats. *At R5, Sac proc and a new combo specifically for this weapon, you can match Serpent Spine R1 80% of the time.NOT RECOMMENDED, but if you must…. Q E N1 E N3 SCA5 D N4 SCA5 E |
 Katsuragikiri Nagamasa (~95% R1-R5) Katsuragikiri Nagamasa (~95% R1-R5) | The only thing this weapon does is make your cow-throwing slightly more effective. You could be crafting Whiteblind instead of this. |
 Rainslasher (R1) (87% - 96%) Rainslasher (R1) (87% - 96%) | You’re probably going to need Fischl for this, and since your team is usually going to be three Geo characters and a healer, you’ll have to sacrifice your healer slot for Fischl. Even then, the damage from this weapon isn’t worth it. |
 Akuoumaru (R1-R5) (93%) Akuoumaru (R1-R5) (93%) | The passive has no effect on Itto’s Burst, making this just an ATK% weapon with no abilities. Remember that Itto’s Burst itself does no damage. |
 Favonius Greatsword (92%) Favonius Greatsword (92%) | Great on purely supporting characters that don’t care about how much damage they do. Itto is not one of those characters. |
 Luxurious Sealord (R5) (92%) Luxurious Sealord (R5) (92%) | This weapon increases Burst damage and does damage when Itto’s Burst hits an enemy. Itto’s Burst neither deals damage nor hits enemies. At least you can watch Itto pulverize people with a fish. |
 Snow-Tombed Starsilver (91% [R1] - 92% [R5]) Snow-Tombed Starsilver (91% [R1] - 92% [R5]) | Another Physical DMG% weapon that Itto can’t make use of. A niche craftable. Throw this on Razor if you have nothing else, but leave Itto out of this. |
 The Bell (R1-R5) (87%) The Bell (R1-R5) (87%) | Who hurt you? |
Team Composition
Hypercarries tend to be stuck with only a few particular teams, without much room to budge.
Eula, for example, relies heavily on Superconduct and a Cryo battery to function at a competitive level. Hu Tao requires Xingqiu for consistent Vaporize reactions and a shielder that doesn’t heal her to maximize her damage.
Itto is no different. Itto mainly synergizes with other Geo characters, namely those that
- Generate Geo particles (Ningguang, Geo Traveler, Albedo to a lesser extent)
- Scale off DEF (Albedo, Gorou)
- Buff Itto without taking much field time (Gorou for DEF, Bennet for ATK)
- Provide Itto with a shield, especially if using Serpent Spine (Zhongli, Diona)
Since Itto is heavily dependent on using his Burst off cooldown, the first teammate must satisfy his energy requirement without forcing Itto to invest too much into Energy Recharge. You’re likely going to end up using two other Geo characters along with him.
Building the Core: Geo Support Information
Gorou

When three Geo characters are in the party, His skill and Burst provide a flat DEF buff and a Geo DMG% increase.
His personal damage is negligible, since he’s a pure support. A Favonius Warbow will help him generate some much-needed particles (obtainable in-game).
Albedo

The only other DEF-scaling Geo units are Noelle, whe takes Itto’s field time (and is redundant), and Yunjin, who buffs normal attacks, but not charged attacks.
Albedo takes almost no field time and is a fine Sub-DPS. At C1 he becomes more reliable with generating particles.
[Itto / Albedo / Gorou / Flex] is often referred to as “Dugtrio”


We’ll talk more in-depth about full team comps later.
Zhongli

If you’re using Serpent Spine on Itto, Zhongli ensures Itto maintains all of its damage-amplifying stacks.
Zhongli can fit into the Dugtrio flex slot if healing is of no concern, or can be used alongside a potent Geo battery; just be mindful of his lengthy Burst animation.
Ninnguang

She doesn’t work as well with Gorou, since she scales off ATK, so her best position is in a non-Gorou team. This doesn’t make or break her viability in a Gorou comp, however. I’d recommend using her with Zhongli.
Traveler (Geo)

Their skill generates 3-4 Geo particles per use, and their burst adds 10% Crit Rate to your team (20 CV).
Compared to Ning, Traveler sacrifices damage for utility.
Fleshing Out the Team: Non-Geo Support Info
Once you have your Geo core, I recommend, generally, a non-Geo character. This is to try and avoid a huge weakness in Geo teams: their impotence in shield-breaking.
Bennett

You’ll get the most out of Bennett when pairing him with ATK scaling units, like Ningguang.
With Bennet providing 4-piece Noblesse buff and Zhongli providing resistance shred and 4pc Tenacity buff, you can stack tons of stats on whoever carries your team, including Itto.
Diona

With either Sacrifical Bow or Favonius Warbow, Diona can contribute to providing energy as well.
On a Zhongli team, her shields are redundant. She shines more in teams including Gorou and Albedo.
Fischl

Electro is the best all-purpose element for breaking non-electro shields, requiring about the same amount of elemental gauge for each kind of shield. This is not true of Pyro and Cryo characters.
However, Fischl cannot heal or shield. She is best when damage is your team’s only concern.
Full Team Compositions
THIS IS A WIP; WAITING ON TEAM CALCULATOR TO BE FINISHED
Until more team calculations are done, we can’t provide exact measures of which team deals the most damage. We can, however break down Itto’s team options into one of two variants:
Dugtrio - Stock Team
“Dugtrio” focuses on the team's DEF scaling; Gorou’s DEF-based buff enables both Itto and Albedo’s damage. Gorou and Albedo both require little to no field time to function, leaving the rest of the time outside of Itto’s Burst to your flex slot.
Dugtrio - Diona Variant

Diona covers this teams need for both shields and heals. This is especially useful if you still depend on a healer to get through Spiral Abyss, and even more if Itto is using Serpent Spine: a weapon that is incredibly powerful, but works best when indefinitely shielded.
A 4pc Noblesse set could go on either Gorou or Diona. Make sure only one of these two hold it; 4pc Noblesse buffs don’t stack. Gorou may be better, since Gorou switches straight to Itto.
Recommended Rotations (WIP!!!):
Diona Hold E > Gorou E > Albedo E > Gorou Q > Itto Combo > Repeat
Diona Hold E > Gorou E > Albedo E Q > Gorou Q > Itto Combo > Repeat
Dugtrio - Zhongli Variant

When compared to Diona, Zhongli sacrifices the team’s shield-breaking efficiency with a non-Geo unit and healing in order to provide a stronger shield and resistance shred.
A benefit of using Zhongli, however, is being able to stack both 4 pc Noblesse and 4pc Tenacity buffs. Zhongli and Albedo together provide energy due to Zhongli’s steeles resonating with other Geo constructs, like Albedo’s elevator. If Gorou is C4, Gorou can contribute some modest healing to fill in the gaps between shields.
Recommended Rotations (WIP!!!):
Zhongli Hold E > Gorou E > Albedo E > Gorou Q > Itto Combo > Repeat
Zhongli Hold E > Gorou E > Albedo E Q > Gorou Q > Itto Combo > Repeat
Dugtrio - Bennett Variant

Bennet mainly serves as a generically good support here, but his buffs and healing are enough so that being generically good is fine. Bennet will nearly always be holding a Noblesse set, which might affect damage and sequencing.
Bennet’s Burst buff lasts longer than Gorou’s, so his Burst should go before Gorou’s. This changes up the rotation a bit.
Recommended Rotations (WIP!!!):
Gorou E > Albedo E > Bennett Q > Gorou Q > Itto Combo > Repeat
Gorou E > Albedo E Q > Bennet Q > Gorou Q > Itto Combo > Repeat
Dugtrio - Fischl Variant

Fischl sacrifices shields and heals for pure damage and energy. Use Fischl if you’re confident you do not need either, and are willing to survive off crystallize shields.
One could, in theory, opt into 4pc Tenacity to sacrifice Fischl personal damage for a team-wide buff that stacks with Gorou’s 4pc Noblesse set.
Recommended Rotations (WIP!!!):
Gorou E > Albedo E > Fischl E > Gorou Q > Itto Combo > Repeat
Gorou E > Albedo E Q > Fischl E > Gorou Q > Itto Combo > Repeat
Ushi Oven - Stock Team

“Ushi Oven” focuses on general purpose damage, as Zhongli and Bennet together provide the team with a plethora of buffs. Geo Traveler or Ningguang should serve as the battery.
Bennet is pretty much a mainstay in this comp, hence the “Oven” part of the team name. Bennet + Zhongli together can power most teams comfortably.
Ushi Oven - Ninnguang Variant

Ningguang takes the most advantage of Bennett and Zhongli’s ATK buffs, as she’s an ATK-scaling Burst DPS. She’s especially powerful at C6, and the low 40 energy requirement on her Burst will ensure she can Burst off cooldown with little help.
Recommended Rotations (WIP!!!):
Zhongli Hold E > Ningguang E, (funnel?), Q > Bennet Q > Itto Combo > Repeat
Ushi Oven - Geo MC Variant

If you don’t have Ningguang, Geo Traveler can do a comparable job as a Geo battery, but trades Burst damage for utility, adding 10% Crit Rate to your team and also being able to hold a Favonius sword if need be for further utility.
Recommended Rotations (WIP!!!):
Zhongli Hold E > Traveler E, (funnel?), Q > Bennet Q > Itto Combo > Repeat
F2P Budget Teams - No Other 5-Stars (WIP)
Focus on 1) Energy, 2) Geo resonance, 3) Buffs/DMG, 4) Shields/Heals
Diona is required if Itto uses Serpent Spine. Give your healer or Traveler 4pc Noblesse.
Itto Resources:
Itto Mastersheet by Sitri#9504 (sheetmaker/calcs), Emiliabyss#1641 (calcs), jrm.spirit#2671 (frame counts), Atilla the Pun#1035 (C1 combo findings)
Itto Combo Mastersheet written by Low priority#3715 from IttoMains
Itto Database by KeqingMains
Change Logs:
1/5/2022: Itto Guide first draft complete. To update: team calcs, optimal rotations, Q&A stuff I missed, editorial revisions, etc.
Closing Thoughts
This is my very first Genshin Impact character guide I’ve written, and everything leading up to this has been an awesome learning experience. I’m very grateful to the people at Wangsheng Funeral Parlor for accepting my application over a month ago and placing their trust in me.
I hope to demonstrate my theorycrafting competence and show off my potential and growth as I continue to work.
Special thanks to Sitri for his patience in handling my many questions and struggles, from learning how to use excel, to making and operating a calculator in sheets, to quality-checking my work. I would have absolutely no idea what I’m doing in terms of math if I didn’t have his guidance.
Thank you also to JRM for quick work in helping me gather all the videos for this guide, and everyone else that I might have missed.
Cheers ~❤
– Emiliabyss
(She / Her)
 Edit this page on GitHub
Enable hardware acceleration for the best site performance | Built using  and
and 
Wangsheng Funeral Parlor is in no way sponsored, endorsed or administered by or associated with miHoYo Co., Ltd.
